5. Administering Inca with incat
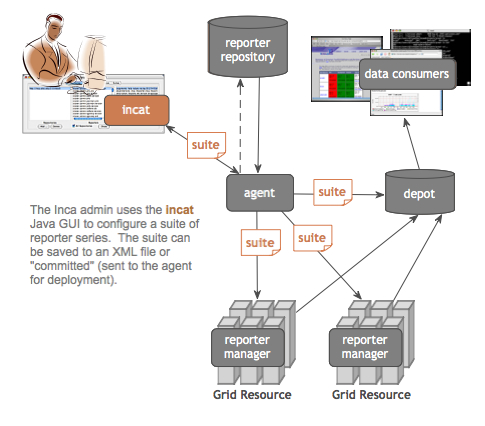
Inca provides a graphical administration tool, named incat, that allows you to configure your deployment. Using incat, you can specify the repositories from which Inca should retrieve reporters, the hosts where you wish to run reporters, and which reporters you wish to run on each host.
You can connect incat to a running Inca Agent via the -A option, e.g., "cd $INCA_DIST; ./bin/inca start incat -A localhost:6323".
As mentioned in the Quick Start guide, you can execute "./bin/inca default" from the command line to install a default Inca configuration. The discussion below describes how you would use incat to specify the same configuration. Before continuing, use the inca script to start both a Depot and an Agent on your host.
5.1. Repositories
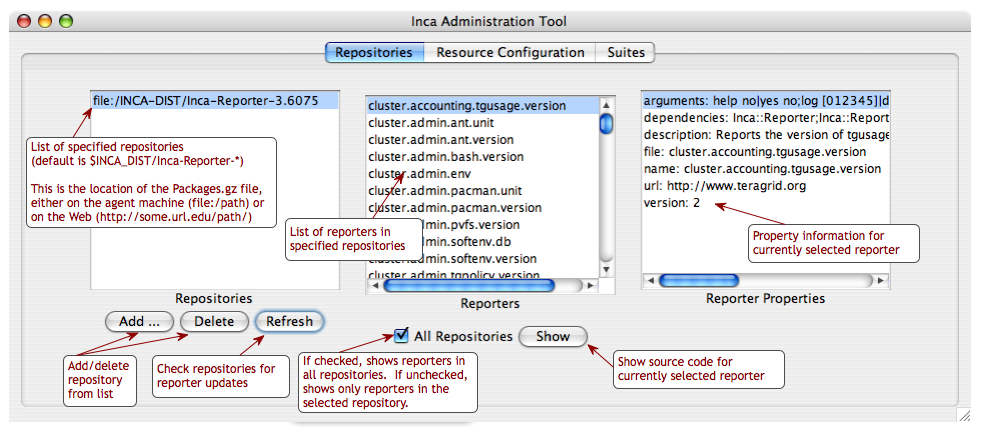
Incat begins by showing the panel for Inca reporter repositories (as shown in Figure 10). The default Inca configuration retrieves reporters from the $INCA_DIST/Inca-Reporter-* repository on the agent machine. To add this repository to your list, press the Add button in the Repositories section, enter the file:/ location of the Packages.gz file in the pop-up window that appears, then press the OK button. Within a few seconds you should see the repository appear in the Repositories list, a set of reporters in the Reporters list, and properties for the first reporter in the Reporter Properties list. Reporter source code is viewable by double clicking on a reporter name or by selecting the reporter name and pressing the "Show" button.
5.2. Resource Configuration
The default Inca configuration defines three resource groups -- a group called "localResource" that specifies the host where the Inca Agent will launch a new Reporter Manager (localhost) and two container groups called "localSite" (contains "localResource") and "defaultGrid" (contains "localSite") that can be extended to include any other hosts running Reporter Managers. The default resource configuration is shown is Figure 11.

The configuration above can be duplicated in an empty Inca installation by pressing the Resource Configuration tab near the top of the incat window and then entering information about the hosts on which you want Inca to run reporters. To define the default groups above in incat, press the Add button in the Resource Groups section to open the resource group edit dialog shown in Figure 12.
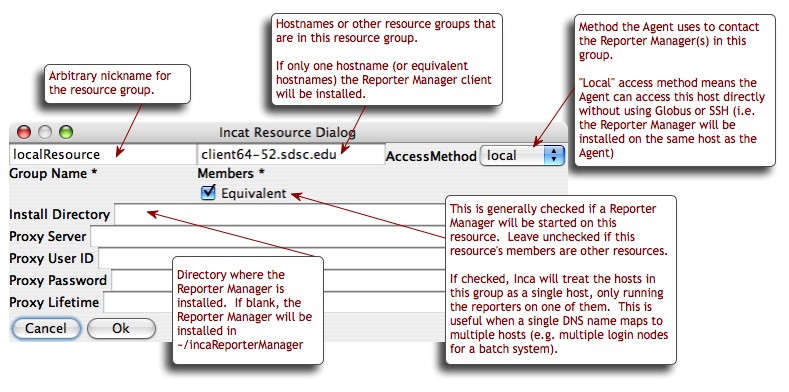
In the Group Name text box, enter the name "localResource" as a nickname for the machine the Reporter Manager client runs on. Enter "localhost" in the Members text box and select "local" as the access method (for a description of access methods see Section 5.5). Press OK to complete entry of this resource group. Incat will close the resource group edit dialog and will display localResource in the Resource Groups section of the Resource Configuration panel.
Press the Add button again to add a second resource group. Give this one the name "defaultGrid" and enter "localResource" in the Members text box. This tells incat that any hosts in the "localResource" group (localhost, in this case) are also part of the defaultGrid group. If you defined other groups, "siteB", "siteC", etc., you could include these in defaultGrid by listing them in the Members text box, separated by spaces. Press OK to complete entry of this resource group. In the Resource Groups list, select each group and notice that localhost is listed in the the Members panel.
5.3. Suites
Pressing the Suites tab near the top of the incat window takes you to incat's suite/series specification panel. Here you specify the reporters you want to run, the resource groups to run them on, how frequently to run them, and the arguments to use when running them.
The default Inca configuration defines a single suite named sampleSuite that contains eight series as shown in Figure 13.
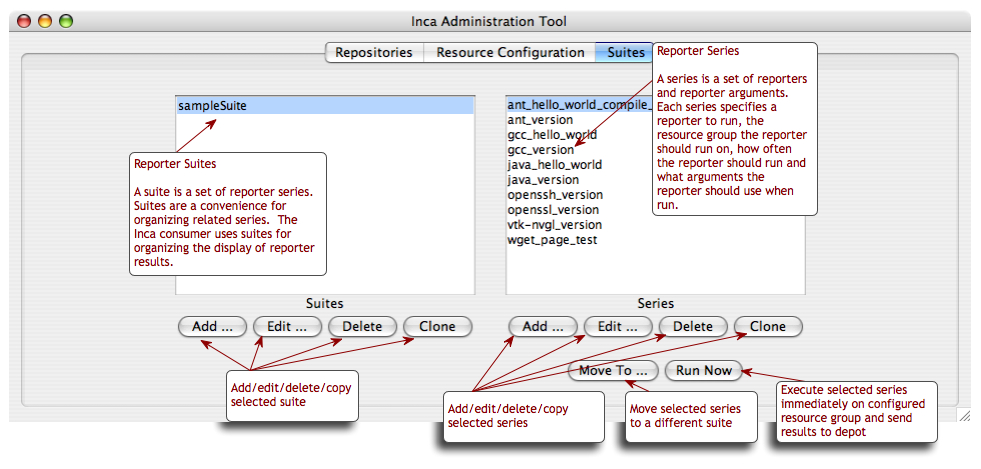
In a new Inca installation, you can add the default suite above by pressing Add button in the Suites section of the panel, entering "sampleSuite" in the pop-up window, then pressing the OK button. To add series to the new suite, press the Add button in the Series section to open the incat series dialog and configure each like the gcc_hello_world series in Figure 14.
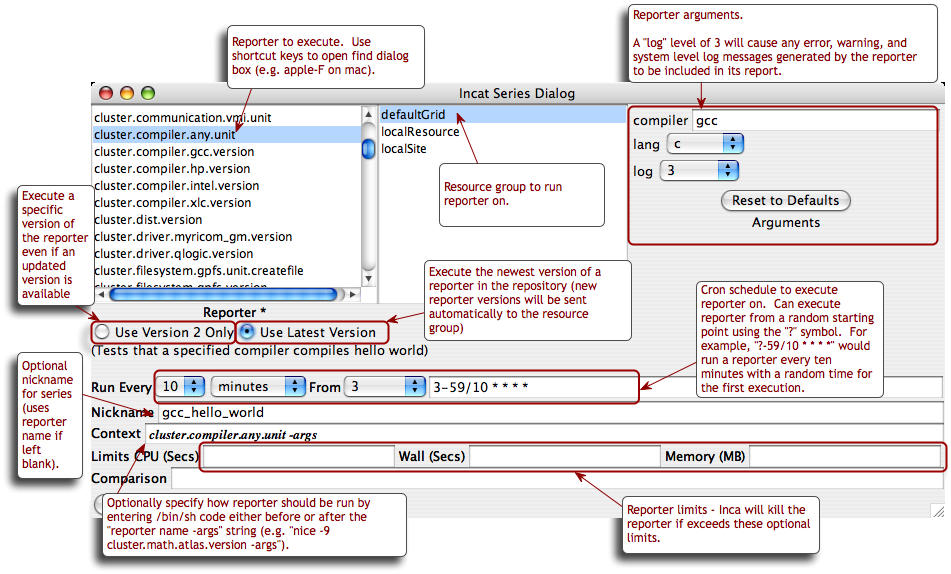
The bottommost box in the series dialog allows you to test the output of the reporter and send email or take other actions if the test fails. This is covered in Section 5.8 below; for this series leave this box blank. Press the OK button, and incat will close the series dialog box and add the series to the Series list in the suite/series specification panel.
The other nine series in the default Inca configuration are composed similarly to the first one. Press the Add button in the series section for each of them, then set the values in the series dialog as specified in the table below. Set the log argument for each series to 3 and the frequency to 10 minutes.
Table 1. Default Configuration Series
Reporter | Nickname | Arguments |
|---|---|---|
cluster.admin.ant.unit | ant_helloworld_compile_test | |
cluster.admin.ant.version | ant_version | |
cluster.compiler.gcc.version | gcc_version | |
cluster.compiler.any.unit | java_hello_world | compiler: javac; lang: java |
cluster.java.sun.version | java_version | |
cluster.interactive_access.openssh.version | openssh_version | ssh: ssh |
cluster.security.openssl.version | openssl_version | |
viz.lib.vtk-nvgl.version | vtk-nvgl_version | |
grid.wget.unit | wget_page_test | page: http://cnn.com/index.html |
5.4. Committing/Saving
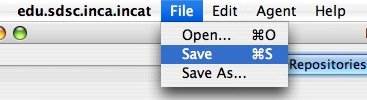
Your Inca deployment configuration is now complete. At this point, it's a good idea to use the "Save" option in incat's File menu to write the configuration to a file (Figure 15). That way, you have a local copy of the configuration that you can later modify. The file is formatted XML; if you're curious, you can read through it to see how incat represents the information you've entered.
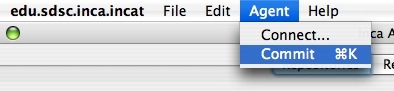
Although your configuration is complete, it's not yet active. To tell Inca to begin running reporters, you need to have incat send your configuration to your Inca Agent. If you started incat with the -A argument, then you're already connected to your Agent. Otherwise, use the "Connect" option in incat's Agent menu to establish a connection. Once you're connected, you can use the "Commit" option in the Agent menu to send the configuration to the Agent (Figure 16). In response, the Agent will install the Inca Reporter Manager code on the host specified in incat's "Resource Configuration" panel and begin running the reporters you specified in the "Suite Series" panel.
5.5. Resource Access Methods
The Inca Agent can use the following access methods to stage and start Reporter Managers on resources:
manual:
Entering a manual resource group indicates that you want complete, direct control over Inca execution on the group. For a manual resource group you must start the Reporter Manager on the command line and restart it any time you want to change the reporter series configuration for the group. The Agent will NOT automatically start a Reporter Manager for a manual resource as it will for local, ssh, or globus2 resources. For a manual resource group, incat provides a text box for you to enter an email that should be notified when the Inca configuration on the resource needs to be updated.
local:
The Agent starts a Reporter Manager on the same machine where the Agent is running (localhost).
ssh:
The Agent starts a Reporter Manager on a remote machine using ssh to access the remote machine. The Agent must have ssh key access to the remote machine. Reporter Manager files are copied from the Agent to the remote machine using sftp. For ssh resource groups, incat provides text boxes for you to enter the login id, password, and path to the ssh key file on the Agent machine. For security purposes, incat displays asterisks for the password and encrypts it when you save the configuration to a file.
globus2:
The Agent starts a Reporter Manager on a remote machine using globus to access the remote machine. Reporter Manager files are copied from the Agent to the remote machine using GridFtp. When you select globus2 in the Access Method pull-down, incat provides text boxes for you to enter contact information for the resource's Globus Gram and GridFtp servers. If you leave these boxes blank, Inca defaults to ports 2119 and 2811, respectively, for the first host in the resource group's member list. Access to Globus hosts requires an active Globus proxy on the Agent's host. You can either create a manual proxy on the Agent machine before starting, or you can store a proxy on a myproxy server and complete the four incat proxy dialog boxes (see below) so that the Agent can obtain one as needed.
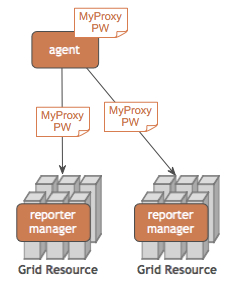
5.6. Proxies
For convenience, the Inca framework can be used to retrieve a proxy for the globus2 access method or for reporters that require an active proxy. Reporters that require a proxy should use the Inca::Reporter::GridProxy module described in Section 7.2.3.
Before configuring Inca to retrieve proxies, first store a proxy on a myproxy server. For information about setting up a myproxy server or storing proxies on a server, please see the official myproxy documentation.
The Agent can automatically retrieve a proxy from a myproxy server if the proxy information is defined in incat as follows:
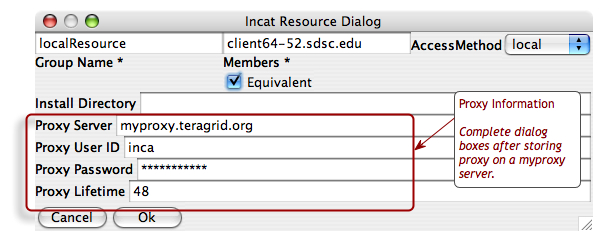
The dialog boxes are the hostname of the myproxy server, the username and password used to store the proxy, and the lifetime in hours that the agent should retrieve a proxy for (the default is 12 hours).
Once proxy information is committed to the agent, it can be retrieved by reporter managers. Each time a reporter manager is ready to run a reporter that needs a proxy it:
requests the MyProxy passphrase from the agent
uses the MyProxy command-line client to retrieve proxy credentials from a MyProxy server
clears the MyProxy passphrase from memory
The MyProxy passphrase is stored on the agent in the $INCA_DIST/var/resources.xml file and is encrypted with the same passphrase as the agent's private key. The MyProxy passphrase passes between the reporter manager and agent over their SSL connection.
5.7. Using Resource Macros
Resource macros provide a shorthand for defining multiple, similar series. For example, suppose you wanted to add three series to the configuration defined above to measure the ping time to three different hosts, named blue.ufo.edu, green.ufo.edu, and red.ufo.edu. One approach would be to define a series for blue, use the Clone button in the Series section of the Suites panel to make two copies, then modify them to ping green and red.
A better approach is to use a macro for the host names and let Inca replicate the series for you. In the Resource Configuration panel, click on defaultGrid in the Resource Group section. Next, press the Add button beneath the Macros section. This opens a dialog box that allows you to enter the name and value(s) of a macro associated with the current resource group.
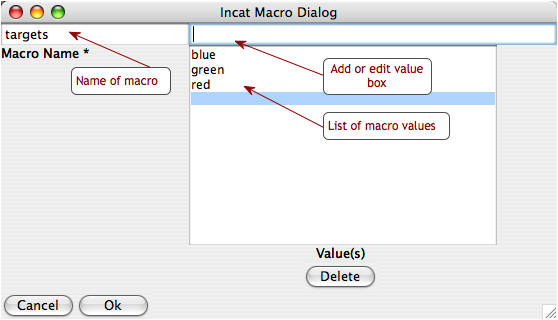
Enter "targets" in the Macro Name text box and "blue" in the macro value edit box, then use the "Add" button or hit "enter/return" to add "green" and "red" as the second and third values of the macro. Afterwards, press OK. The definition of the targets macro now appears in the Macros section of the Resource Configuration panel. You may also edit values in the list by selecting them, changing the value in the edit value box, and hitting "enter/return". To delete macro values, select the value in the list and press the "Delete" button.
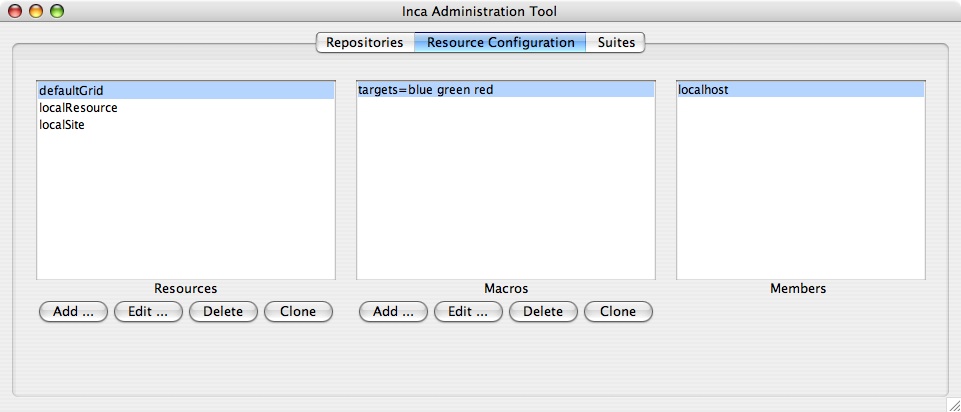
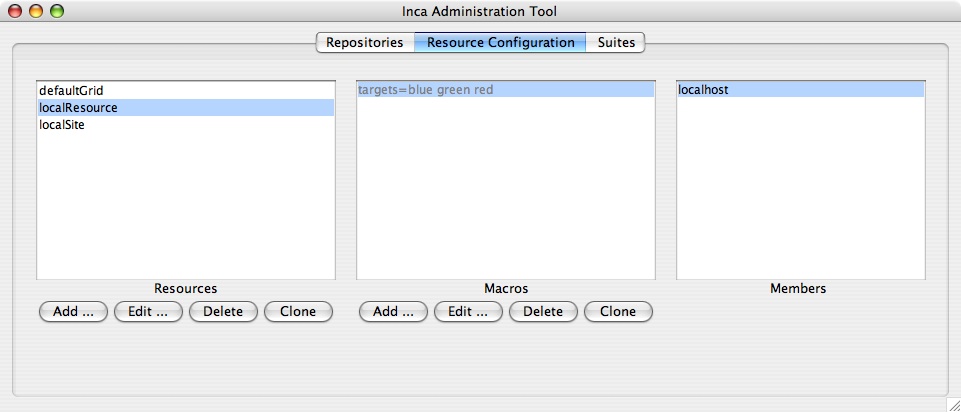
The targets macro is also defined for the other resource groups since the defaultGrid contains all other groups. As shown in Figure 17, macros appear grey if they were defined in a resource group other than the one selected. You can override an inherited macro value by selecting the macro in the Macros panel and pressing the Edit button to open the macro edit dialog. After you change the macro value and press OK, the updated macro definition will show in black in the Macros panel, indicating that the resource is no longer using the inherited value.
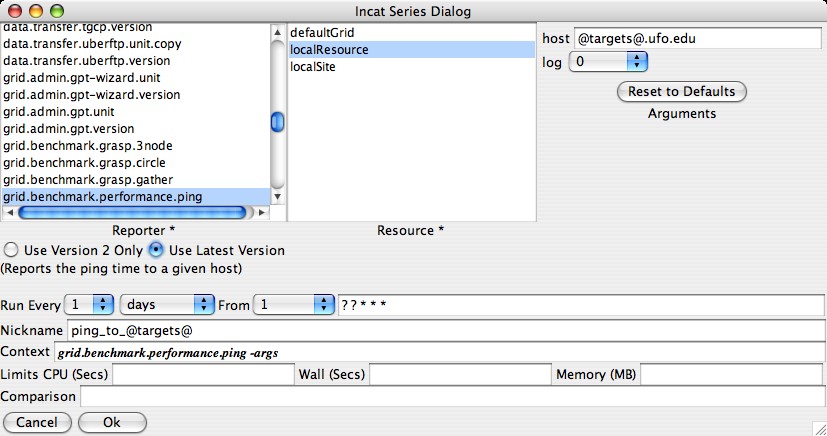
To make use of the macro you've defined, click the Suites tab, then press the Add button underneath the Series section to open the series edit dialog. In the dialog, set the reporter to grid.benchmark.performance.ping and the resource group to localResource.
In the host text box in the Arguments section of the dialog, enter "@targets@.ufo.edu". Macro references in incat are indicated by placing a "@" before and after the macro name. When the Inca Agent encounters a macro reference in a series, it makes one copy of the series for each value of the macro. Since the targets macro has three values--blue, green, and red--the Inca Agent will make three copies of this series, substituting a single value for the macro reference in each. In this case that means that you'll have one series with a host argument of "blue.ufo.edu", one with a host argument of "green.ufo.edu", and one with a host argument of "red.ufo.edu".
The inca web pages use the series nickname when displaying series results. If you leave the series nickname with its default value, the name of the reporter, then all three series will have the same nickname. Instead, you can enter "ping_to_@targets@" in the nickname text box. The Inca Agent will expand this reference in parallel with the reference in the host argument, so your three series will have the nicknames ping_to_blue, ping_to_green, and ping_to_red, respectively.
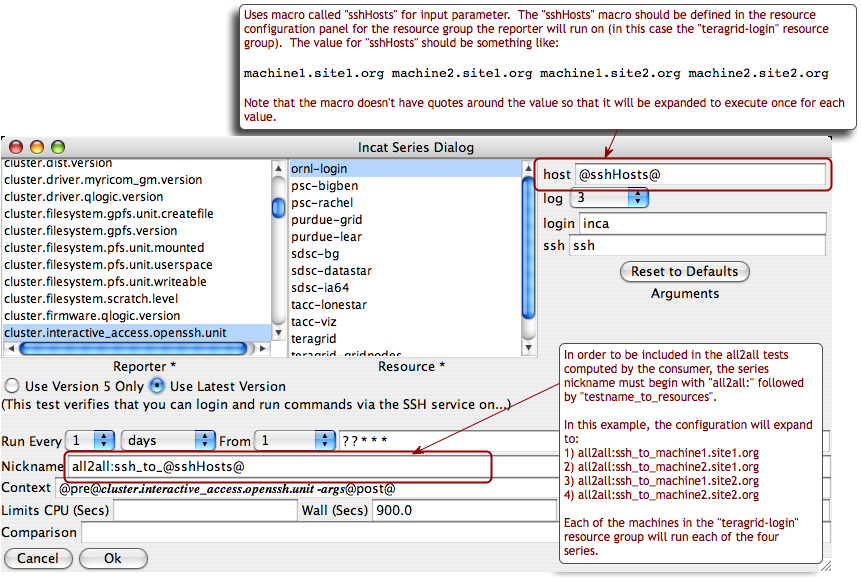
5.7.1. Configuring "all2all" Series Using Macros
The "all2all" test results are calculated by the consumer. The image below illustrates how an "all2all" series would be configured.
5.8. Series Comparison and Notification
For a particular series, the Inca system by default reports only whether or not the series reporter was able to execute successfully--whether a version reporter was able to determine a package version, a unit reporter was able to run a program, etc. Using Inca's comparison and notification feature, you can refine a series to define success more precisely and to receive notification from Inca when a series reporter detects a problem. The bottom text boxes of the series edit dialog provide access to Inca's comparison and notification feature.
The comparison expression can test the content of the report body, the content of the report error message, or the value of any symbols defined in the report body by <ID> tags. The expression may use any of the boolean operators <, <=, >, >=, ==, and !=, plus perl's pattern match (=~) and mismatch (!~) operators. One simple test would be "body =~ /./", which would test whether the report body contained any characters. Tests can be joined together by the && and || operators. Using these, you could ignore an expected, minor error with the test "body =~ /./ || errorMessage == 'Try again later'".
As mentioned above, you can include symbols defined in the report body in your tests. The Inca system uses the content of any subsequent tag as the symbol value. For example, the body of the output of the gcc version reporter might be
  <body>
    <package>
      <ID>gcc</ID>
      <version>3.1</version>
    </package>
  </body>
|
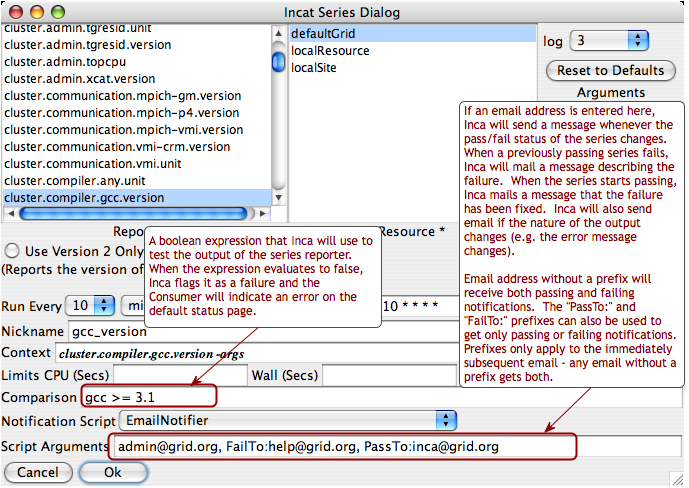
Here, Inca will use "3.1" as the value of the symbol "gcc". With this output, the comparison test "gcc >= 3.0" would succeed, while the comparison "gcc == 3.0" would fail. If the report body contains an <ID> tag with no subsequent tag, the value of the symbol is defined to be "".
The image below illustrates how a comparison for subpackage versions would be configured.

Inca supports the ability to run a script that notifies you of changes in a series comparison. When you specify a series comparison in the incat series dialog, two additional components become visible. The Notification Script pull-down menu allows you to select the script to run, and the Script Parameters text box allows you to enter parameters to pass to the script. By default, the Inca installation provides two notification scripts, EmailNotifier and LogNotifier. The first sends email to each address specified by the script parameters; the second writes a message to the specified log file. See Section 11.2 for directions on customizing the notifications you receive.