4. Quick Start
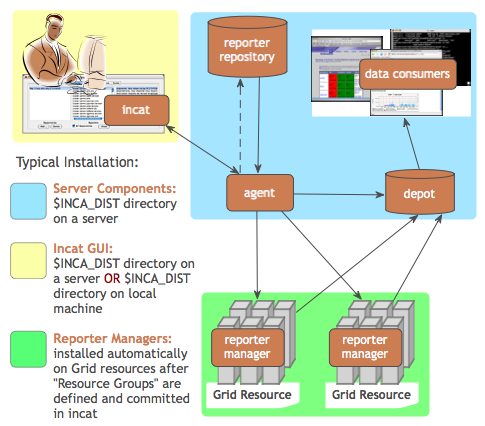
This section describes how to download, install and verify the Inca 2.5 binary release. The figure below represents a typical installation.
| Step 1: Download the installer script |
| Step 2: Run the installer script |
| Step 3: Change to the Inca installation directory |
| Step 4: Create credentials for Inca components |
| Step 5: Start up Inca components with a sample default configuration |
| Step 6: View the Inca web server pages |
| Step 7: View the sample default configuration using the Inca GUI tool |
Download the incaInstall.sh script:
% wget http://inca.sdsc.edu/releases/2.5/incaInstall.sh
Execute the install script to download the binary distribution from our website and unpack it into an installation directory. The installation directory is represented by the $INCA_DIST environment variable - it may be useful to set this variable now.
% sh incaInstall.sh $INCA_DIST core
$INCA_DIST is the location of the directory where you want to install Inca. You should see something like:
Retrieving http://inca.sdsc.edu/releases/current/
inca-common-java-bin.tar.gz
--12:49:38--  http://inca.sdsc.edu/releases/current/
inca-common-java-bin.tar.gz
=> `inca-common-java-bin.tar.gz'
Resolving inca.sdsc.edu... 198.202.75.28
Connecting to inca.sdsc.edu|198.202.75.28|:80... connected.
HTTP request sent, awaiting response... 200 OK
Length: 5,921,461 [application/x-tar]

100%[======================>] 5,921,461    1.23M/s  ETA 00:00

12:49:43 (1.18 MB/s) - `inca-common-java-bin.tar.gz'
saved [5921461/5921461]
...
common-java installed ...
agent installed ...
consumers installed ...
depot installed ...
incat installed
Change to the top level directory of your Inca installation:
% cd $INCA_DIST
Create certificates for the Inca components (enables secure component communication):
% ./bin/inca createauth
NOTE: the default life of 2.5 certificates is 5 years (1 year in earlier releases). To replace expired certificates, execute "bin/inca createauth" again to create new certificates and "bin/inca agent -u <resource group> -logfile var/upgrade.log" to update the certificates on the reporter managers.
Output from "bin/inca createauth" looks similar to the text below. When completed, you should see a certificate/key created for each of the four Inca components and stored in $INCA_DIST/etc:
password> (choose a password for your Inca installation administration)
Confirm password> (reenter the same password)
Generating a 512 bit RSA private key
.++++++++++++
writing new private key to 'clientx.sdsc.edukey.pem'
-----
agent
Generating a 512 bit RSA private key
.++++++++++++
writing new private key to 'agentkey.pem' ...
writing new private key to 'consumerkey.pem' ...
writing new private key to 'depotkey.pem' ...
writing new private key to 'incatkey.pem' ...
Start the Inca server components and deploy the sample default configuration (NOTE: this command only needs to be executed ONCE. The components started in this step can later be stopped with "./bin/inca stop all" and started with "./bin/inca start all". A restart command is also available). The Inca server components are agent, depot, and consumer and will be started on ports 6323, 6324, and 8080 respectively. Please edit the inca.properties file in etc/common to change the default ports for the agent and depot. For the consumer, the port number can be customized in etc/jetty.xml. More information can be found in Section 11.
% ./bin/inca default
You should see something like:
password> (enter password from the last step)
Preparing to deploy default Inca configuration...
Initializing Inca configuration...
** Warning:  this will erase any previously collected reporter
    state on the Inca depot and configuration on the agent
    Do you wish to continue (y/n)? y
Initializing depot...
Initializing c3p0 pool... com.mchange.v2.c3p0.PoolBackedDataSource@90....
Database Initialization Completed
done
Initializing agent
done
Started Inca agent
Started Inca consumer
Started Inca depot
Sleeping for 20 seconds while the components come online
Deploying default configuration
During this step:
three server components are started on localhost:
% ps | grep java
3527 p1 S 0:14.21 /usr/bin/java -Xmx256m edu.sdsc.inca.Agent -l agent.log
3560 p1 S 0:17.63 /usr/bin/java -Xmx256m edu.sdsc.inca.Depot -l depot.log
3593 p1 S 0:15.43 /usr/bin/java -Xmx256m edu.sdsc.inca.Consumer consumer.log
a sample test suite called sampleSuite is sent to the agent. The sample suite contains a schedule for executing each of the following reporters every ten minutes:
cluster.admin.ant.unit  			(ant_helloworld_compile_test)
cluster.admin.ant.version  			(ant_version)
cluster.compiler.any.unit  			(gcc_hello_world)
cluster.compiler.gcc.version  			(gcc_version)
cluster.compiler.any.unit  			(java_hello_world)
cluster.java.sun.version  			(java_version)
cluster.interactive_access.openssh.version	(openssh_version)
cluster.security.openssl.version		(openssl_version)
viz.lib.vtk-nvgl.version			(vtk-nvgl_version)
grid.wget.unit					(wget_page_test)
a client component is started on localhost:
% ps | grep Manager
5382 p1 S 0:02.14 /usr/bin/perl reporter-manager
                  -d incas://client64-236.sdsc.edu:6324 -c etc/rmcert.
The agent receives sampleSuite suite and installs a reporter manager on the localhost in ~/incaReporterManager (takes 1-5 minutes - view progress of build in ~/incaReporterManager/build.log)
After the reporter manager is built, it registers itself with the agent. The agent will send the reporter manager the set of reporters, libraries, and execution schedule.
The reporter manager executes reporters based on the execution schedule and sends reports to the depot.
To view results and verify that your Inca installation is working correctly, open the URL below in a browser. Starting a web server is not required, but you may need to replace "localhost" with the full hostname of your machine.
http://localhost:8080
You should see a start up screen similar to the figure below initially indicating an empty Inca configuration.
After a few minutes (when the consumer cache is refreshed), reload the page and you should see a start up screen similar to the figure below showing one suite called sampleSuite (our default sample configuration), a resource group called defaultGrid, a resource group called localSite, and one resource called localResource which is a nickname for the machine you installed an Inca reporter manager on.
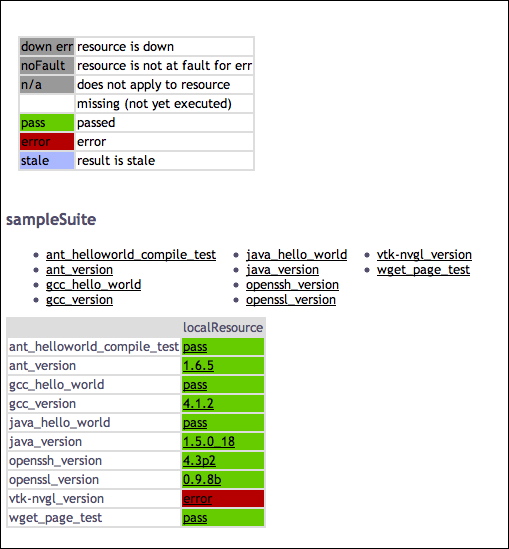
Select sampleSuite and defaultGrid and press the Submit button. You should see a page similar to the figure below with the reporter series scheduled to execute on localhost. The reporters test a small set of compiler, grid services, math library and scientific visualization packages. Each reporter may perform a software package version query (e.g., gcc) and/or unit test (e.g., java -- unit test name is java_hello_world). Almost all boxes should be empty indicating that the reports have not yet been received.
Refresh the page after a few minutes and you should begin to see more boxes filled in until it looks like the below figure. If you do not see a results filled in, check the .log files in $INCA_DIST/var for ERROR or Exception. See Section 13.1 for more information about logging.
You can also navigate to this page from the "table of sampleSuite results" link under "Current Data" in the page header.
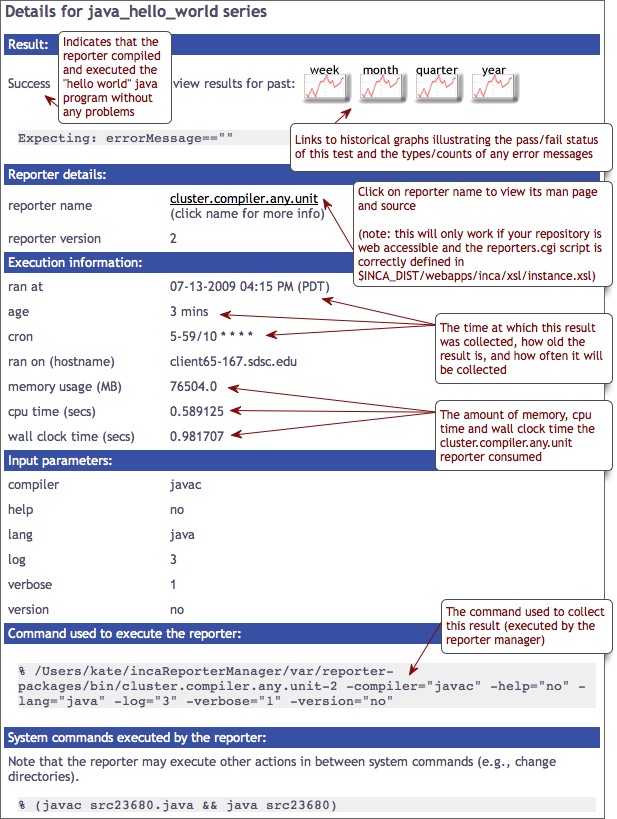
Click on any red/green box to see the details of how the result was collected. The figure below shows the details of the cluster.compiler.any.unit reporter that compiles and executes a small hello world java program.
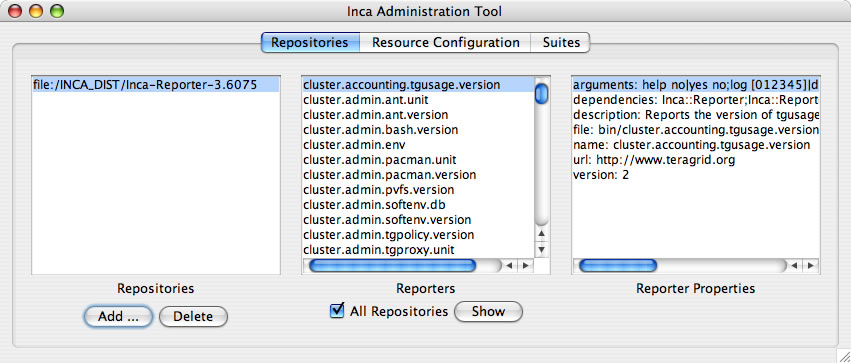
View the Inca sample default configuration using the Inca GUI tool, incat (Inca Administration Tool). You can use incat to make changes to the default configuration (e.g., add a new resource to defaultGrid or add new tests to sampleSuite). See Section 5 for more information about using incat.
Use the following command to start incat:
% ./bin/inca start incat -A localhost:6323
You should now see the Java GUI window appear on your local machine. If you don't see Java GUI windows pop up like those in Figure 8 and Figure 9, it is probable that X-Window forwarding is not set up correctly between the machine where you installed Inca and your local machine. You can either configure X-Window forwarding, or you can start incat on a local machine as described in step 8.
Once incat has information from the agent, the following screen will display:THIS STEP IS OPTIONAL. If you don't see Java GUI windows pop up like those in Figure 8 and Figure 9, you can use this step to install incat on a local machine.
Copy the incaInstall.sh script to a local machine.
% wget http://inca.sdsc.edu/releases/2.5/incaInstall.sh
Install incat on a local machine:
% ./incaInstall.sh $INCA_DIST incat
Copy the incat key, certificate, and trusted directory from the original machine to your local machine:
% scp orig.machine:$ORIG_INCA_DIST/etc/incatkey.pem $INCA_DIST/etc/
% scp orig.machine:$ORIG_INCA_DIST/etc/incatcert.pem $INCA_DIST/etc/
% scp "orig.machine:$ORIG_INCA_DIST/etc/trusted/*" $INCA_DIST/etc/trusted/
Edit the $INCA_DIST/etc/common/inca.properties local file and change the incat key/cert to the incat key/cert:
17 inca.incat.cert=incatcert.pem
...
29 inca.incat.key=incatkey.pem
Start the incat component on a local machine with the agent hostname from the original machine:
% cd $INCA_DIST; ./bin/inca start incat -A ORIGHOST:6323 &