6. Data Display (Data Consumers)
The data that the Inca depot stores, as with all database data, can be displayed in many ways. An Inca data consumer is anything that retrieves data from the depot and displays it (e.g. a JSP, SQL query, CGI, etc.).
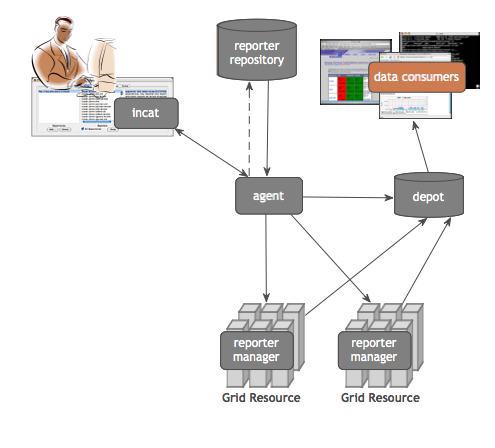
Data consumers can query the Inca depot to produce current and historical reports and graphs or customized status information. The Inca depot has Perl and Java client APIs for its pre-defined queries (see Section 8).
6.1. Default Data Consumer
The default data consumer is a Web ARchive (WAR) file that contains a collection of JavaServer Pages (JSP) and their associated files. The WAR file is initially installed as $INCA_DIST/webapps/inca.war and is deployed with Jetty when the consumer is started (e.g. ./bin/inca start consumer). The default consumer creates a Jetty directory like $INCA_DIST/var/jetty*/webapp for each WAR file in $INCA_DIST/webapps - custom WAR files can be dropped into the $INCA_DIST/webapps directory and deployed by restarting the consumer. Currently Inca WAR files cannot be deployed outside of the Inca consumer server (e.g. in Apache Tomcat). The consumer will start on port 8080 unless the $INCA_DIST/etc/jetty.xml is edited as described in Section 6.4.
There are three main JSP contained in the inca.war:
index.jsp:
Lists an installation's configured suites and resource names in an HTML form whose action is to display results for the selected suite and resource. The consumer initially redirects to this page (http://localhost:8080/inca/index.jsp).
The index.jsp uses JSP tag libraries to retrieve current suite configuration from the depot's queryGuids() function and cached resource configuration information from the agent's getConfig() function.
The XML returned by the depot and agent functions is transformed into an HTML form for selecting a suite and resource to view results for. The stylesheet that does the XML to HTML transformation is $INCA_DIST/etc/index.xsl - if it does not exist the JSP will display the depot/agent XML.
config.jsp:
Prints description of deployed suites and series. This page is linked at the bottom of index.jsp (http://localhost:8080/inca/config.jsp?xsl=config.xsl).
The config.jsp uses JSP tag libraries to retrieve current catalog configuration from the agent's getCatalogAsXml() function and cached suite configuration infomation from the agent's getConfig() function.
The XML returned by the agent functions is transformed into HTML by the stylesheet passed via the "xsl" parameter. By default the "xsl" parameter is "config.xsl", which translates to the $INCA_DIST/etc/config.xsl file, but it can be set to any XSL file in $INCA_DIST/etc. If the "xsl" parameter is not passed to the script (http://localhost:8080/inca/config.jsp), the XML returned from the agent functions is displayed.
xslt.jsp:
Displays results for a set of suites or reporter details. This page is the action of the index.jsp form to display a single suite's results. (http://localhost:8080/inca/xslt.jsp?suiteName=sampleSuite&resourceID=defaultGrid&xsl=default.xsl).
Suite results:
In order to display results for a set of suites, the xslt.jsp requires the "suiteName" and "resourceID" parameters. The JSP uses these parameters to retrieve cached results from the depot. The "suiteName" and "resourceID" parameters may contain a single value (e.g. "suiteName=sampleSuite&resourceID=defaultGrid") or multiple comma-separated values (e.g. "suiteName=sampleSuite,myNewSuite&resourceID=defaultGrid,newSuiteResources"). If multiple suites and resources are used, the JSP will return results for each suite/resource pair in the order they are entered. If multiple suites and a single resource are used, the JSP will return results for each suite using the same resource.
An optional "xmlFile" parameter (e.g. "xmlFile=swStack.xml") adds the content of an XML file in $INCA_DIST/etc/common to the cached depot results. This can be useful for advanced data display. An example stylesheet to use with this parameter is located in $INCA_DIST/etc/swStack.xsl (e.g. "xmlFile=swStack.xml&xsl=swStack.xsl").
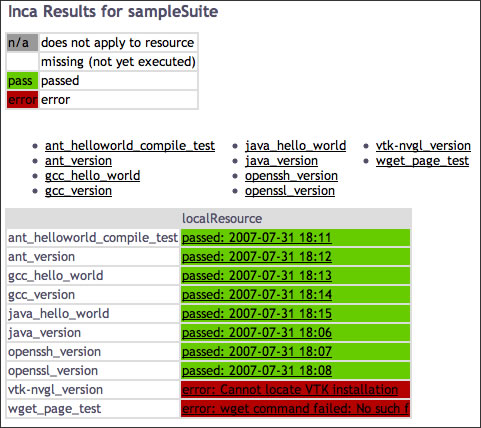
The XML returned from the depot cache and optional "xmlFile" parameter is transformed into HTML by the stylesheet passed via the "xsl" parameter. By default the "xsl" parameter is "default.xsl", which translates to the $INCA_DIST/etc/default.xsl file, but it can be set to any XSL file in $INCA_DIST/etc. If the "xsl" parameter is not set (http://localhost:8080/inca/xslt.jsp?suiteName=sampleSuite&resourceID=defaultGrid), the XML returned from the depot cache and "xmlFile" parameter is displayed:
<all2allSummaries> (cross-site test results calculated by the consumer):
The default installation doesn't include cross-site tests; this section will be empty unless the Inca admin creates all2all series in incat. Cross-site, or "all to all", tests determine whether all resources in a Grid can reach all other resources (e.g. via gsissh, gram, gridftp). To be included in cross-site test calculation, a series must be assigned a nickname like "all2all:x_to_y" in incat. Cross-site failures are calculated differently than regular failures. For example, resource A will not be assigned a failure trying to reach resource B if all other resources trying to reach resource B also fail (i.e. there is a problem with resource B not resource A). Section 5.7.1 describes how to configure all2all tests in incat.
<all2allSummaries xmlns="http://inca.sdsc.edu/dataModel/all2all_2.0">
  <resources xmlns="">
    <resource>
      <name>localResource</name>
      <testSummaries>
        <testSummary>
          <name>gridftp</name>
          <numSuccesses>15</numSuccesses>
          <numAtFaultFailures>0</numAtFaultFailures>
          <numNotAtFaultFailures>1</numNotAtFaultFailures>
          <failures/>
        </testSummary>
        <testSummary>
          <name>gram</name>
          <numSuccesses>13</numSuccesses>
          <numAtFaultFailures>1</numAtFaultFailures>
          <numNotAtFaultFailures>0</numNotAtFaultFailures>
          <failures>
            <failure>
              <nickname>all2all:gram_to_localResource</nickname>
              <instanceId>239352</instanceId>
              <seriesConfigId>172057</seriesConfigId>
            </failure>
          </failures>
        </testSummary>
      </testSummaries>
    </resource>
  </resources>
</all2allSummaries>
<suite> (from xslt.jsp "suiteName" parameter):
Array of report summaries for the suite. This part of the XML is retrieved from the pre-defined depot query that takes a suite name and returns summaries for the latest series instance in that suite.
<suite>
 <reportSummary>
  <hostname>host1.name</hostname>
  <uri>http://repository/globus.unit.xio</uri>
  <nickname>gt4-xio</nickname>
  <seriesConfigId>115446</seriesConfigId>
  <instanceId>118115</instanceId>
  <gmt>2006-11-16T23:49:49.000-08:00</gmt>
  <body/>
 </reportSummary>
 <reportSummary>
  <hostname>host2.name</hostname>
  <uri>http://repository/globus.unit.xio</uri>
  <nickname>gt4-xio</nickname>
  <seriesConfigId>115466</seriesConfigId>
  <instanceId>219103</instanceId>
  <gmt>2006-12-15T01:31:53.000-08:00</gmt>
  <body>
    <unitTest>
      <ID>xioTest</ID>
    </unitTest>
  </body>
 </reportSummary>
</suite>
<resourceConfig> (from xslt.jsp "resourceID" parameter):
Array of all resources within a given resource group and their macros. This part of the XML is retrieved from the agent.
<resourceConfig>
  <resources>
    <resource>
      <name>localResource</name>
      <macros>
        <macro>
          <name>__regexp__</name>
          <value>host.sitea.org</value>
        </macro>
      </macros>
    </resource>
  </resources>
</resourceConfig>
extra xml (from xslt.jsp "xmlFile" parameter):
XML from the file passed as the xslt.jsp xmlFile parameter. The default file is $INCA_DIST/etc/common/swStack.xml, but any XML file in the $INCA_DIST/etc/common directory can be passed as the xslt.jsp xmlFile parameter and it will automatically be picked up by the data consumer.
<stack>
  <id>Software and Services</id>
  <category>
    <id>Math Libraries</id>
    <package>
      <id>globus</id>
      <version>4.0.1</version>
      <tests>
        <version>
	  <id>gt4-version</id>
	</version>
        <unitalias>
	  <id>gt4-xio</id>
	</unitalias>
        <unitalias>
	  <id>all2all:gram_to_localResource</id>
	</unitalias>
      </tests>
    </package>
  </category>
</stack>
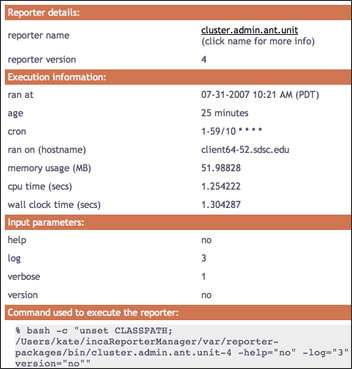
Reporter detail results:
In order to display reporter detail results, the xslt.jsp requires a "configID" parameter for the series. The JSP uses this parameter to retrieve reporter results from the depot. If an "instanceID" parameter is not also supplied, the JSP returns a history of XML results for the series. If an "instanceID" parameter is supplied, the JSP returns XML results for a the specified instance of the series.
The XML reporter results are transformed into HTML by the stylesheet passed via the "xsl" parameter. By default the "xsl" parameter is "instance.xsl", which translates to the $INCA_DIST/etc/instance.xsl file, but it can be set to any XSL file in $INCA_DIST/etc. If the "xsl" parameter is not set, the XML reporter results are displayed:
<reportDetails>
  <suiteId>1</suiteId>
  <seriesConfigId>5</seriesConfigId>
  <seriesId>5</seriesId>
  <reportId>1</reportId>
  <instanceId>73</instanceId>
  <seriesConfig>
    <series>
     ...
    </series>
    <nickname>java_hello_world</nickname>
    <resourceHostname>localResource</resourceHostname>
    <schedule>
     ...
    </schedule>
    <action>add</action>
  </seriesConfig>
  <report>
     ...
  </report>
  <sysusage>
     ...
  </sysusage>
  <stderr/>
</reportDetails>
6.2. Changing the Look
6.2.1. Colors and Fonts
Properties such as colors and fonts are controlled by the default CSS (Cascading Style Sheet) located in $INCA_DIST/var/jetty*/webapp/css/inca.css. For example, to change the color in the reporter detail pages header bar open inca.css and change lines 111-112 to:
.header {
background-color: #D07651; |
For general information, visit the [ CSS tutorial ].
6.2.2. HTML Layout
The three default JSP scripts retrieve XML data from the agent and depot and then use the XSL stylesheets in $INCA_DIST/etc to transform the XML into HTML. The following stylesheets are installed with the default consumer:
index.xsl:
Lists all configured suite and resource names in an HTML form whose action is to display results for the selected suite and resource.
The index.xsl stylesheet is applied to XML returned by index.jsp.
config.xsl:
Prints description of deployed suites and series.
The config.xsl stylesheet is applied to XML returned by config.jsp.
default.xsl:
Prints table of suite(s) results.
The default.xsl stylesheet is applied to XML returned by xslt.jsp.
swStack.xsl:
Prints table of suite(s) results. Uses XML file to format table rows by software categories and packages.
The swStack.xsl stylesheet is applied to XML returned by xslt.jsp.
summary.xsl:
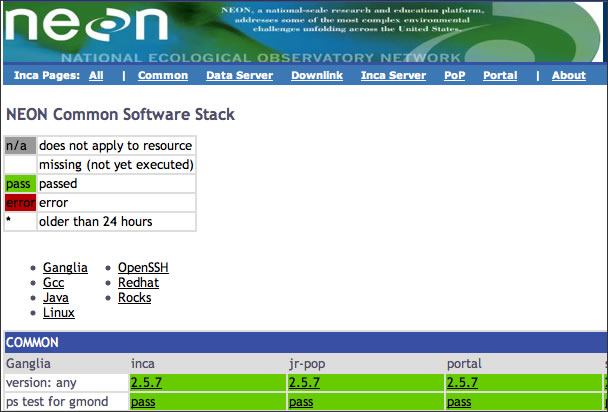
Prints summary results table with a list of resources in the left column and a list of the suite tests each resource is failing in the right column. Failing tests are listed by name and by overall percentage passing in suite. Uses XML file (swStack.xml by default) to get test groups.
The summary.xsl stylesheet is applied to XML returned by xslt.jsp.
instance.xsl:
Prints HTML table with report details.
The instance.xsl stylesheet is applied to XML returned by xslt.jsp.
header.xsl:
Prints HTML page header with a link to inca.css between <header> tags.
The header.xsl stylesheet is included in most other stylesheets.
footer.xsl:
Prints HTML page footer with the Inca logo.
The footer.xsl stylesheet is included in most other stylesheets.
legend.xsl:
Prints a key to cell colors and text.
The legend.xsl stylesheet is included in the default.xsl and swStack.xsl stylesheets.
inca-common.xsl:
Common templates for use in Inca stylesheets.
The inca-common.xsl stylesheet is included in most other stylesheets.
To modify the default HTML layout, edit the XSL stylesheet that is being applied to the JSP or create a new stylesheet in $INCA_DIST/etc and pass it to the JSP as the "xsl" parameter.
For general information about editing stylesheets, visit the [ XSL tutorial ].
6.2.2.1. Custom Values in HTML Table Cells
To display report values other than the default text of either a software version, "pass", or "error" on the suite results pages, edit default.xsl.
For example, to change the default suite status to print the time successful reporters ran and a truncated error message for failures like:
Edit default.xsl, add a new variable for the custom table cell text and print the custom cell text rather than the default text:
188 <xsl:variable name="cellText">
189 <xsl:choose>
190 <xsl:when test="string($instance)=''">
191 <xsl:value-of select="''" />
192 </xsl:when>
193 <xsl:when test="string($result/body)!=''
194 and string($result/errorMessage)=''
195 and ($comparitor='Success' or count($comparitor)=0)">
196 passed:�
197 <!-- get yyyy-mm-dd from gmt timestamp -->
198 <xsl:value-of select="substring($result/gmt, 1, 10)" />�
199 <!-- get HH:MM from gmt timestamp -->
200 <xsl:value-of select="substring($result/gmt, 12, 5)" />
201 </xsl:when>
202 <xsl:otherwise>
203 error:
204 <xsl:value-of select="substring($result/errorMessage, 1, 30)" />
205 </xsl:otherwise>
206 </xsl:choose>
207 </xsl:variable>
208 <xsl:choose>
209 <xsl:when test="$exit!=''">
210 <td class="{$exit}">
211 <a href="{$href}"><xsl:value-of select="$cellText"/></a>
212 <xsl:if test="$url[matches(., 'markOld')]"> |
6.2.2.2. Custom HTML Header
An example of customizing the HTML header would be to add a call to a custom header stylesheet in the "printBodyTitle" template. Edit inca-common.xsl:
13  <xsl:include href="custom-header.xsl"/>
...
24  <xsl:template name="printBodyTitle">
25    <xsl:param name="title"/>
26    <xsl:call-template name="custom-header"/>
27    <xsl:variable name="datenow" select="date:new()" />
28    <xsl:variable name="dateformat" select="sdf:new('MM-dd-yyyy hh:mm a (z)')"/>
29    <table width="100%" border="0">
30 <tr align="left"> |
Create a $INCA_DIST/etc/custom-header.xsl like:
<?xml version="1.0" encoding="UTF-8"?>

<!-- ================================================ -->
<!-- Prints out custom header for Inca status pages   -->
<!-- ================================================ -->
<xsl:stylesheet version="1.0"
                xmlns:xsl="http://www.w3.org/1999/XSL/Transform"
                xmlns="http://www.w3.org/1999/xhtml">

  <xsl:template name="custom-header">
    <table class="header" width="100%">
      <tr>
        <td bgcolor="#003366">
          <img class="logo" src="img/header.jpg"/>
        </td>
      </tr>
    </table>
    <table class="menu" width="100%">
      ... custom navigation ...
    </table>
 </xsl:template>

</xsl:stylesheet> |
The resulting page would look something like:
6.3. Changing the Installation Location
You can install the data consumer in a non-default location (e.g. on a machine where the depot and agent are not running) if you:
Copy the incaInstall.sh script to the machine where the consumer will run.
% wget http://inca.sdsc.edu/releases/2.1/incaInstall.sh
Install consumer on the new machine:
% ./incaInstall.sh $INCA_DIST consumers
Copy the consumer key, certificate, and trusted directory from the machine where the agent/depot are running (orig.machine) to the new machine:
% scp orig.machine:$ORIG_INCA_DIST/etc/consumerkey.pem $INCA_DIST/etc/; \
scp orig.machine:$ORIG_INCA_DIST/etc/consumercert.pem $INCA_DIST/etc/;
scp "orig.machine:$ORIG_INCA_DIST/etc/trusted/*" $INCA_DIST/etc/trusted/;
Edit the $INCA_DIST/etc/common/inca.properties local file and specify the full hostname of the machine where the agent and depot are running:
114 inca.consumer.agent=incas://agent.hostname:6323
...
128 inca.consumer.depot=incas://depot.hostname:6324
Start the consumer component on the new machine:
% cd $INCA_DIST; ./bin/inca start consumer
6.4. Changing the Port
By default, the consumer is started on port 8080. To change this, edit the etc/jetty.xml file and search for 'SocketListener'. To change the port to say 8085, change the following line:
<Set name="Port"><SystemProperty name="jetty.port" default="8080"/></Set> |
to:
<Set name="Port">8085</Set> |
6.5. Enabling https
By default, the consumer is configured as an http server. To disable http and enable https, edit the jetty.xml file in $INCA_DIST/etc and
comment out the section "Add and configure a HTTP listener to port 8080"
uncomment the section "Add a HTTPS SSL listener on port 8443".
Note that the example below is to disable http and enable https. However, http and https can be enabled simultaneously if both sections are left uncommented.
  <!-- - - - - - - - - - - - - - - - - - - - - - - - - - - - - - - - - -->
  <!-- Add and configure a HTTP listener to port 8080                  -->
  <!-- The default port can be changed using: java -Djetty.port=80     -->
  <!-- - - - - - - - - - - - - - - - - - - - - - - - - - - - - - - - - -->
  <!--
  <Call name="addListener">
    <Arg>
      <New class="org.mortbay.http.SocketListener">
        <Set name="Port"><SystemProperty name="jetty.port"
default="8080"/></Set>
  <Set name="PoolName">P1</Set>
        <Set name="MinThreads">20</Set>
        <Set name="MaxThreads">200</Set>
        <Set name="lowResources">50</Set>
        <Set name="MaxIdleTimeMs">30000</Set>
        <Set name="LowResourcePersistTimeMs">2000</Set>
        <Set name="acceptQueueSize">0</Set>
        <Set name="ConfidentialPort">8443</Set>
        <Set name="IntegralPort">8443</Set>
      </New>
    </Arg>
  </Call>
  -->


  <!-- - - - - - - - - - - - - - - - - - - - - - - - - - - - - - - - - -->
  <!-- Add a HTTPS SSL listener on port 8443                           -->
  <!-- - - - - - - - - - - - - - - - - - - - - - - - - - - - - - - - - -->
  <Call name="addListener">
    <Arg>
      <New class="org.mortbay.http.SslListener">
        <Set name="Port">8443</Set>
        <Set name="PoolName">P1</Set>
        <Set name="MaxIdleTimeMs">30000</Set>
        <Set name="lowResources">30</Set>
        <Set name="LowResourcePersistTimeMs">2000</Set>
        <Set name="Keystore">etc/consumerKeystore</Set>
        <Set name="KeyPassword">OBF:1v8w1v2h1wg01z0d1z0h1wfy1v1x1v9q</Set>
        <Set name="Password">OBF:1v8w1v2h1wg01z0d1z0h1wfy1v1x1v9q</Set>
        <Set name="HttpHandler">
          <New class="org.mortbay.http.handler.MsieSslHandler">
      <Set name="UserAgentSubString">MSIE 5</Set>
    </New>
        </Set>
      </New>
    </Arg>
</Call> |
Then restart the consumer.
% ./bin/inca stop consumer; ./bin/inca start consumer |
The https server will be on port 8443.
https://hostname:8443 |
 | By default, the https server will use the credential stored in $INCA_DIST/etc/consumerKeystore. Its DN is "cn=Inca Consumer SSL, o=SDSC, l=San Diego, st=California, c=US". If you'd like to generate a certificate with a different DN, run the keytool command as follows: |
% rm -f etc/consumerKeystore; keytool -keystore etc/consumerKeystore \ -alias jetty -genkey -keyalg RSA -dname your_DN |
It will prompt you for a keystore password and a key password. You can either make them different or use the same one. If you use the password "consumer", no further changes are needed. Otherwise, you will have to modify <Set name="KeyPassword"> and <Set name="Password"> in the "Add a HTTPS SSL listener on port 8443" section in jetty.xml. You can either put the password in there in plain text or obfuscate it using Jetty's password utility as follows:
% java -classpath lib/org.mortbay.jetty-5.1.10.jar:lib/commons-logging-1.0.4.jar \ org.mortbay.util.Password your_password |
It will output two lines such as follows:
OBF:1v8w1v2h1wg01z0d1z0h1wfy1v1x1v9q MD5:1005b14bd29466723ace30d26f602f5b |
Open etc/jetty.xml and replace the string beginning with OBF in both <Set name="KeyPassword"> and <Set name="Password"> with the string provided by Jetty's password utility:
<Set name="KeyPassword">OBF:1v8w1v2h1wg01z0d1z0h1wfy1v1x1v9q</Set> <Set name="Password">OBF:1v8w1v2h1wg01z0d1z0h1wfy1v1x1v9q</Set> |
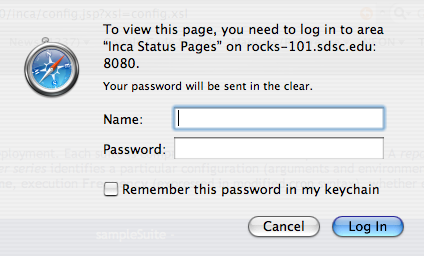
6.6. Adding Password Protection
By default, a password is not required for a user to access the status pages served by the consumer. To require a password, edit $INCA_DIST/etc/webdefault.xml and uncomment the section "Require password authentication to access Inca status pages". Note that there are two sections with that title -- one for http and the other for https. Uncomment the appropriate section such as:
  <!-- ==================================================================== -->
  <!-- Require password authentication to access Inca status pages          -->
  <!--                        (http version)                                -->
  <!-- ==================================================================== -->
  <security-constraint>
    <web-resource-collection>
      <web-resource-name>Any User</web-resource-name>
      <url-pattern>/*</url-pattern>
    </web-resource-collection>
    <auth-constraint>
      <role-name>*</role-name>
    </auth-constraint>
  </security-constraint>

  <login-config>
    <auth-method>BASIC</auth-method>
    <realm-name>Inca Status Pages</realm-name>
</login-config> |
By default, the username and password for the pages will be "inca". To change this, edit $INCA_DIST/etc/realm.properties and customize the username and password for your installation. If you do not want to store the password in plain text, use Jetty's password utility described in Section 6.5.
Then restart the consumer.
% ./bin/inca stop consumer; ./bin/inca start consumer |
The next time you view the status pages, you should see a login like: