- Table of Contents
- 1. Introduction
- 2. Requirements
- 3. Recommendations
- 4. Quick Start
- 5. Administering Inca with incat
- 5.1. Repositories
- 5.2. Resource Configuration
- 5.3. Suites
- 5.4. Committing/Saving
- 5.5. Resource Access Methods
- 5.6. Proxies
- 5.7. Using Resource Macros
- 5.8. Series Comparison and Notification
- 6. Data Display (Data Consumers)
- 7. Reporters and Repositories
- 8. Inca Client APIs
- 9. Web Services
- 10. Security
- 11. Log Files
- 12. Advanced Configuration
- 12.1. Inca Component Options
- 12.2. Depot Database Configuration
- 12.3. Manual Access Method
- 12.4. Source Distributions
- 13. Component Man Pages
- 13.1. Depot
- 13.2. Agent
- 13.3. Reporter Manager
- 13.4. Consumer
- 13.5. Incat
- 13.6. Inca Web Services
1. Introduction
Determining whether a Grid is up in the face of complex Grid software deployments can be difficult and depends on the types of applications and users that utilize it. By detailing a set of software, services, and features that should be available on a Grid in a machine-readable format, a Grid can be tested periodically by an automated system to verify its health and usability to users. To this end, we have developed Inca as a flexible framework to perform periodic, user-level functionality testing and performance measurement of Grid systems. It includes mechanisms to schedule the execution of information gathering scripts, and to collect, archive, publish, and display data
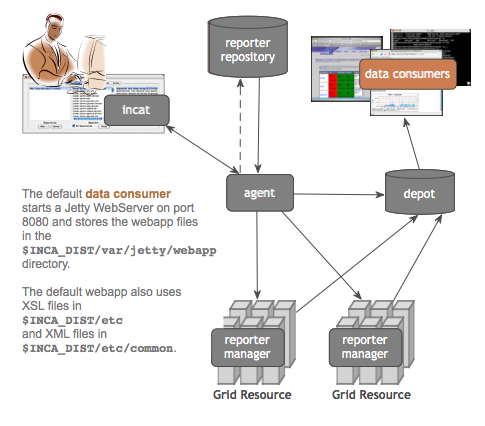
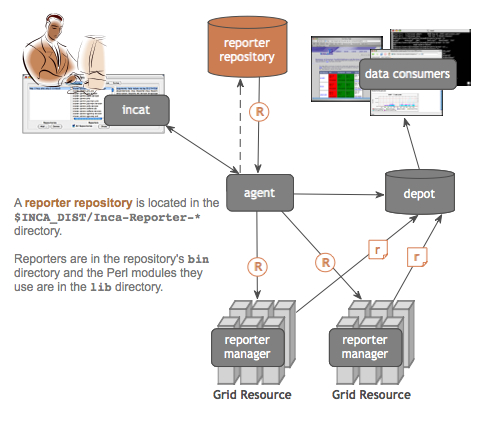
The architecture of Inca and a description of its components is shown in the below figures.
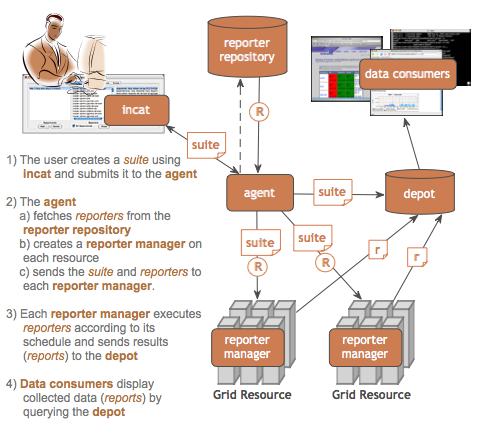
| A reporter is an executable program that tests or measures some aspect of the system or installed software. |
| A report is the output of a reporter and is a XML document complying to the reporter schema in Section 7.2.1. |
| A suite specifies a set of reporters to execute on selected resources, their configuration, and frequency of execution. |
| A reporter repository contains a collection of reporters and is available via an URL. |
| A reporter manager is responsible for managing the schedule and execution of reporters on a single resource. |
| A agent is a server that implements the configuration specified by the Inca Administrator. |
| incat is a GUI used by the Inca administrator to control and configure the Inca deployment on a set of resources. |
| A depot is a server that is responsible for storing the data produced by reporters. |
| A data consumer is typically a web page client that queries a depot for data and displays it in a user-friendly format. |
2. Requirements
The initial default installation of Inca has the following requirements:
JDK or JRE 1.4.2_09 or greater
Perl 5.8.6 or greater
OpenSSL-0.9.6[jkl] or OpenSSL-0.9.7b or greater
GNU tar (i.e., no limit on filename length)
For each resource Inca will be monitoring, the following is required:
Perl 5.8.x or greater
OpenSSL-0.9.6[jkl] or OpenSSL-0.9.7b or greater
GNU tar (i.e., no limit on filename length)
3. Recommendations
We recommend that Inca be run under a regular user account and not as root for the following reasons:
To best detect user-level problems, Inca should be run under a regular user account with the default environment setup.
Inca does not require any special privileges to run.
Furthermore, we recommend that a valid GSI credential be obtained for this regular user account so that tests of Grid software requiring proxy certificates can be executed. Please request a GSI credential from your virtual organization's Certificate Authority (CA) and consult your organization's security policy regarding GSI credential use. Section 5.6 describes using proxy credentials in the Inca framework.
4. Quick Start
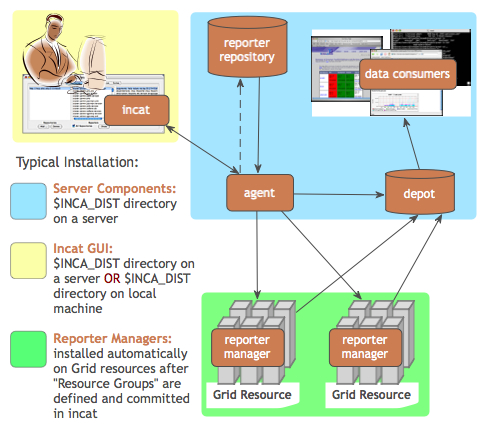
This section describes how to download, install and verify the Inca 2.01 binary release. The figure below represents a typical installation.
| Step 1: Download the installer script |
| Step 2: Run the installer script |
| Step 3: Change to the Inca installation directory |
| Step 4: Create credentials for Inca components |
| Step 5: Start up Inca components with a sample default configuration |
| Step 6: View the Inca web server pages |
| Step 7: View the sample default configuration using the Inca GUI tool |
Download the incaInstall.sh script:
% wget http://inca.sdsc.edu/releases/2.01/incaInstall.sh
Execute the install script to download the binary distribution from our website and unpack it into an installation directory. The installation directory is represented by the $INCA_DIST environment variable - it may be useful to set this variable now.
% sh incaInstall.sh $INCA_DIST core
$INCA_DIST is the location of the directory where you want to install Inca. You should see something like:
Retrieving http://inca.sdsc.edu/releases/current/inca-common-java-bin.tar.gz
--12:49:38--  http://inca.sdsc.edu/releases/current/inca-common-java-bin.tar.gz
=> `inca-common-java-bin.tar.gz'
Resolving inca.sdsc.edu... 198.202.75.28
Connecting to inca.sdsc.edu|198.202.75.28|:80... connected.
HTTP request sent, awaiting response... 200 OK
Length: 5,921,461 [application/x-tar]

100%[======================>] 5,921,461    1.23M/s  ETA 00:00

12:49:43 (1.18 MB/s) - `inca-common-java-bin.tar.gz' saved [5921461/5921461]
...
common-java installed ...
agent installed ...
consumers installed ...
depot installed ...
incat installed
Change to the top level directory of your Inca installation:
% cd $INCA_DIST
Create certificates for the Inca components (enables secure component communication):
% ./bin/inca createauth
The output will look similar to below and when it is completed, you should see a certificate/key created for each of the four Inca components and stored in $INCA_DIST/etc:
password> (choose a password for the administration of your Inca installation)
Generating a 512 bit RSA private key
.++++++++++++
writing new private key to 'clientx.sdsc.edukey.pem'
-----
agent
Generating a 512 bit RSA private key
.++++++++++++
writing new private key to 'agentkey.pem' ...
writing new private key to 'consumerkey.pem' ...
writing new private key to 'depotkey.pem' ...
writing new private key to 'incatkey.pem' ...
Start the Inca server components and deploy the sample default configuration (NOTE: this command only needs to be executed ONCE. The components started in this step can later be stopped with "./bin/inca stop all" and started with "./bin/inca start all"). The Inca server components are agent, depot, and consumer and will be started on ports 6323, 6324, and 8080 respectively. Please edit the inca.properties file in etc/common to change these defaults. More information can be found in Section 12.
% ./bin/inca default
You should see something like:
password> (enter password from the last step)
Preparing to deploy default Inca configuration...
Initializing Inca configuration...
** Warning:  this will erase any previously collected reporter
    state on the Inca depot and configuration on the agent
    Do you wish to continue (y/n)? y
Initializing depot...
Initializing c3p0 pool... com.mchange.v2.c3p0.PoolBackedDataSource@904b13 [ connectionPoolDataSource -> com.mchange.v2.c3p0.WrapperConnectionPoolDataSource@58bc22 [ acquireIncrement -> 1, acquireRetryAttempts -> 30, acquireRetryDelay -> 1000, autoCommitOnClose -> false, automaticTestTable -> null, breakAfterAcquireFailure -> false, checkoutTimeout -> 0, connectionTesterClassName -> com.mchange.v2.c3p0.impl.DefaultConnectionTester, factoryClassLocation -> null, forceIgnoreUnresolvedTransactions -> false, idleConnectionTestPeriod -> 0, initialPoolSize -> 3, maxIdleTime -> 1800, maxPoolSize -> 10, maxStatements -> 50, maxStatementsPerConnection -> 0, minPoolSize -> 3, nestedDataSource -> com.mchange.v2.c3p0.DriverManagerDataSource@e8b5fe [ description -> null, driverClass -> null, factoryClassLocation -> null, jdbcUrl -> jdbc:hsqldb:test, properties -> {user=******, password=******} ] , preferredTestQuery -> null, propertyCycle -> 300, testConnectionOnCheckin -> false, testConnectionOnCheckout -> false, usesTraditionalReflectiveProxies -> false ] , factoryClassLocation -> null, numHelperThreads -> 3, poolOwnerIdentityToken -> 904b13 ]
Database Initialization Completed
done
Initializing agent
done
Started Inca agent
Started Inca consumer
Started Inca depot
Sleeping for 20 seconds while the components come online
Deploying default configuration
During this step:
three server components are started on localhost:
% ps | grep java
 3527  p1  S      0:14.21 /usr/bin/java -Xmx256m edu.sdsc.inca.Agent -l /inca-dist/./bin/../var/agent.log
 3560  p1  S      0:17.63 /usr/bin/java -Xmx256m edu.sdsc.inca.Depot -l /inca-dist/./bin/../var/depot.log
 3593  p1  S      0:15.43 /usr/bin/java -Xmx256m edu.sdsc.inca.Consumer -l /inca-dist/./bin/../var/consumer.log
a sample suite called sampleSuite is sent to the agent requesting reporters to be started on a localhost client using the schedule:
1-59/10 * * * * cluster.math.atlas.version
2-59/10 * * * * cluster.compiler.gcc.version
3-59/10 * * * * cluster.security.openssl.version
4-59/10 * * * * cluster.interactive_access.openssh.version
5-59/10 * * * * cluster.interactive_access.openssh.unit
6-59/10 * * * * viz.lib.vtknvgl.version
7-59/10 * * * * viz.lib.chromium.version
8-59/10 * * * * cluster.compiler.any.unit
a client component is started on localhost:
% ps | grep Manager
 5382  p1  S      0:02.14 /usr/bin/perl /home/incaReporterManager/sbin/../sbin/reporter-manager -d incas://client64-236.sdsc.edu:6324 -c etc/rmcert.
The agent receives sampleSuite suite and installs a reporter manager on the localhost in ~/incaReporterManager (takes 1-5 minutes - view progress of build in ~/incaReporterManager/build.log)
After the reporter manager is built, it registers itself with the agent. The agent will send the reporter manager the set of reporters, libraries, and execution schedule.
The reporter manager executes reporters based on the execution schedule and sends reports to the depot.
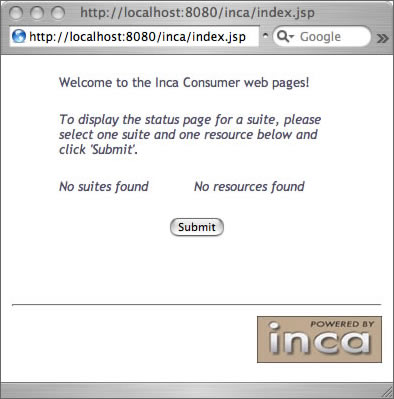
To view results and verify that your Inca installation is working correctly, open the URL below in a browser. Starting a web server is not required, but you may need to replace "localhost" with the full hostname of your machine.
http://localhost:8080
You should see a start up screen similar to the figure below initially indicating an empty Inca configuration.
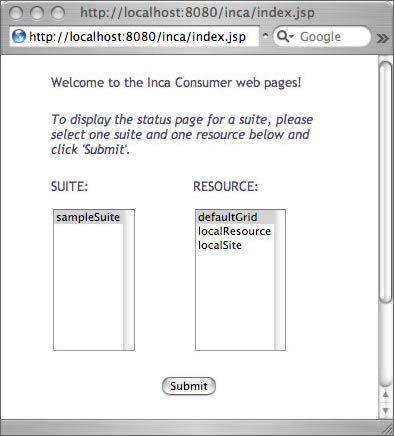
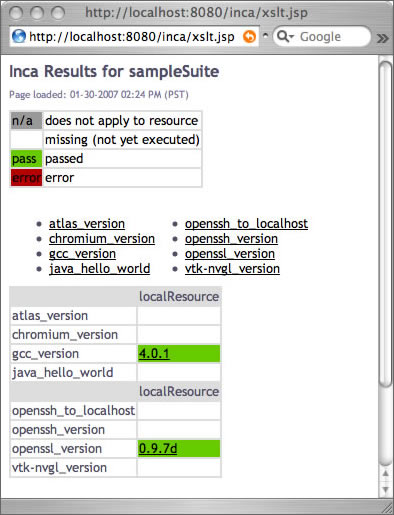
After a few minutes (when the consumer cache is refreshed), reload the page and you should see a start up screen similar to the figure below showing one suite called sampleSuite (our default sample configuration), a resource group called defaultGrid, a resource group called localSite, and one resource called localResource which is a nickname for the machine you installed an Inca reporter manager on.
Select sampleSuite and defaultGrid and press the Submit button. You should see a page similar to the figure below with the reporter series scheduled to execute on localhost. The reporters test a small set of compiler, grid services, math library and scientific visualization packages. Each reporters may perform a software package version query (e.g., gcc) and/or unit test (e.g., java -- unit test name is java_hello_world). Almost all boxes should be empty indicating that the reports have not yet been received.
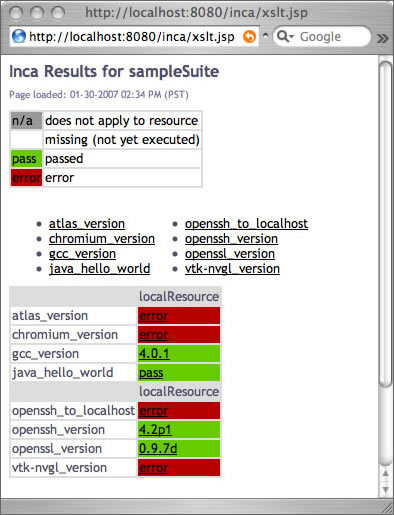
Refresh the page after a few minutes and you should begin to see more boxes filled in until it looks like the below figure. If you do not see a results filled in, check the .log files in $INCA_DIST/var for ERROR or Exception. See Section 11 for more information about logging. Note that the "openssh_to_localhost" box will remain blank until myproxy is configured according to Section 5.6 because the reporter uses the Inca::Reporter::GridProxy module.
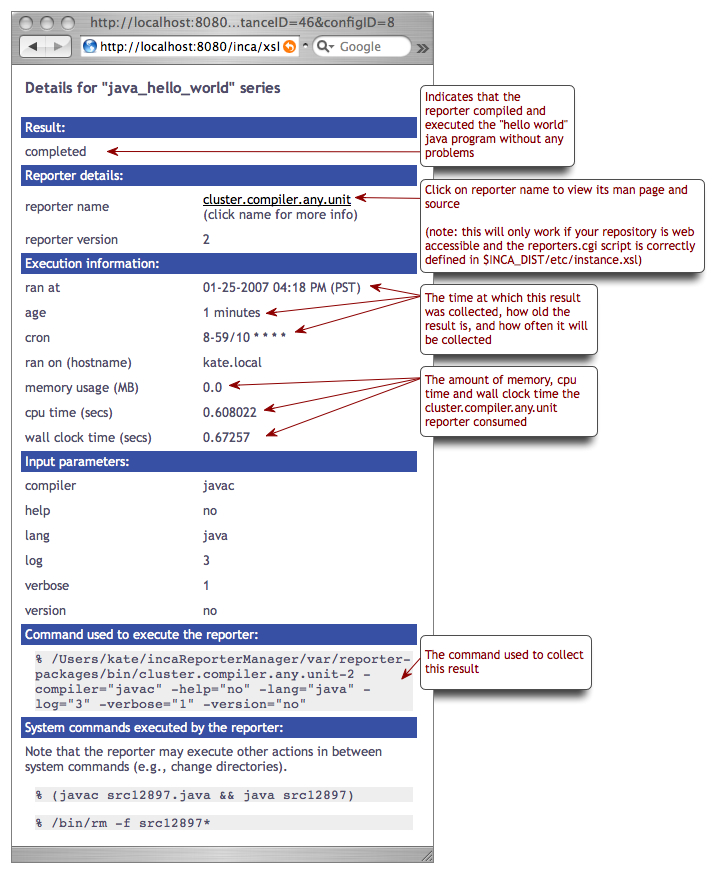
Click on any red/green box to see the details of how the result was collected. The below figure shows the details of the cluster.compiler.any.unit reporter that compiles and executes a small hello world java program.
View the Inca sample default configuration using the Inca GUI tool, incat (Inca Administration Tool). You can use incat to make changes to the default configuration (e.g., add a new resource to defaultGrid or add new tests to sampleSuite). See Section 5 for more information about using incat.
Use the following command to start incat:
% ./bin/inca start incat -A localhost:6323
You should now see the Java GUI window appear on your local machine. If you don't see Java GUI windows pop up like those in Figure 8 and Figure 9, it is probable that X-Window forwarding is not set up correctly between the machine where you installed Inca and your local machine. You can either configure X-Window forwarding, or you can start incat on a local machine as described in step 8.
Once incat has information from the agent, the following screen will display:THIS STEP IS OPTIONAL. If you don't see Java GUI windows pop up like those in Figure 8 and Figure 9, you can use this step to install incat on a local machine.
Copy the incaInstall.sh script to a local machine.
% wget http://inca.sdsc.edu/releases/2.01/incaInstall.sh
Install incat on a local machine:
% ./incaInstall.sh $INCA_DIST incat
Copy the incat key, certificate, and trusted directory from the original machine to your local machine:
% scp orig.machine:$ORIG_INCA_DIST/etc/incatkey.pem $INCA_DIST/etc/; \
scp orig.machine:$ORIG_INCA_DIST/etc/incatcert.pem $INCA_DIST/etc/;
scp "orig.machine:$ORIG_INCA_DIST/etc/trusted/*" $INCA_DIST/etc/trusted/;
Edit the $INCA_DIST/etc/common/inca.properties local file and change the agent key/cert to the incat key/cert:
17 inca.agent.cert=incatcert.pem
...
29 inca.agent.key=incatkey.pem
Start the incat component on a local machine with the agent hostname from the original machine:
% cd $INCA_DIST; ./bin/inca start incat -A ORIGHOST:6323 &

5. Administering Inca with incat
Inca provides a graphical administration tool, named incat, that allows you to configure your deployment. Using incat, you can specify the repositories from which Inca should retrieve reporters, the hosts where you wish to run reporters, and which reporters you wish to run on each host.
You can connect incat to a running Inca Agent via the -A option, e.g., "cd $INCA_DIST; ./bin/inca start incat -A localhost:6323".
As mentioned in the Quick Start guide, you can execute "./bin/inca default" from the command line to install a default Inca configuration. The discussion below describes how you would use incat to specify the same configuration. Before continuing, use the inca script to start both a Depot and an Agent on your host.
5.1. Repositories
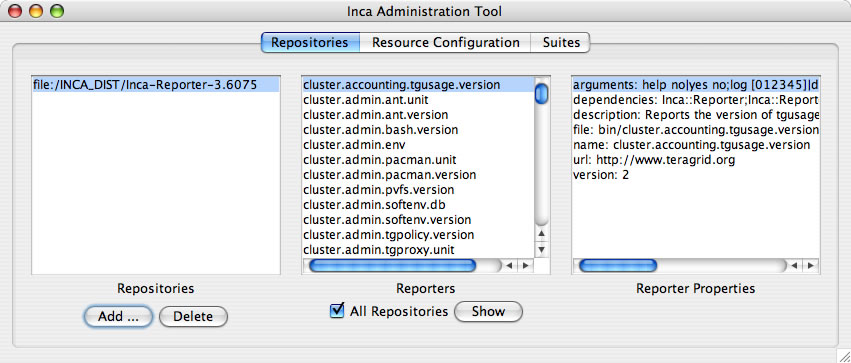
Incat begins by showing the panel for Inca reporter repositories (as shown in Figure 10). The default Inca configuration retrieves reporters from the $INCA_DIST/Inca-Reporter-* repository on the agent machine. To add this repository to your list, press the Add button in the Repositories section, enter the file:/ location of the Packages.gz file in the pop-up window that appears, then press the OK button. Within a few seconds you should see the repository appear in the Repositories list, a set of reporters in the Reporters list, and properties for the first reporter in the Reporter Properties list. Reporter source code is viewable by double clicking on a reporter name or by selecting the reporter name and pressing the "Show" button.
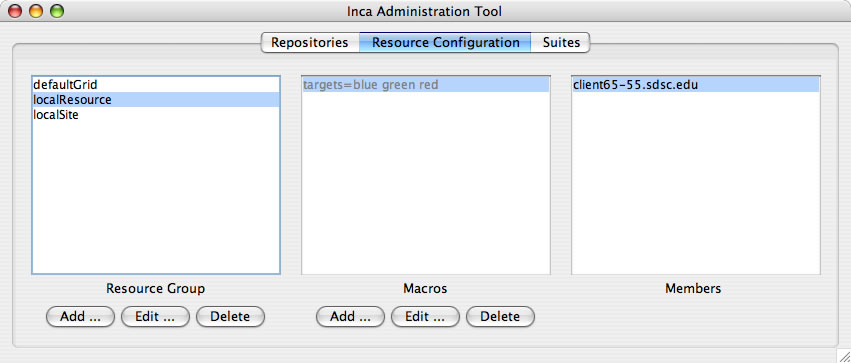
5.2. Resource Configuration
The default Inca configuration defines three resource groups -- a group called "localResource" that specifies the host where the Inca Agent will launch a new Reporter Manager (localhost) and two container groups called "localSite" (contains "localResource") and "defaultGrid" (contains "localSite") that can be extended to include any other hosts running Reporter Managers. The default resource configuration is shown is Figure 11.

This configuration above can be duplicated in an empty Inca installation by pressing the Resource Configuration tab near the top of the incat window and then entering information about the hosts on which you want Inca to run reporters. To define the default groups above in incat, press the Add button in the Resource Groups section to open the resource group edit dialog shown in Figure 12.
In the Group Name text box, enter the name "localResource" as a nickname for the machine the Reporter Manager client runs on. Enter "localhost" in the Members text box and select "local" as the access method. Press OK to complete entry of this resource group. Incat will close the resource group edit dialog and will display localResource in the Resource Groups section of the Resource Configuration panel.
Press the Add button again to add a second resource group. Give this one the name "defaultGrid" and enter "localResource" in the Members text box. This tells incat that any hosts in the "localResource" group (localhost, in this case) are also part of the defaultGrid group. If you defined other groups, "siteB", "siteC", etc., you could include these in defaultGrid by listing them in the Members text box, separated by spaces. Press OK to complete entry of this resource group. In the Resource Groups list, select each group and notice that localhost is listed in the the Members panel.
5.3. Suites
Pressing the Suites tab near the top of the incat window takes you to incat's suite/series specification panel. Here you specify the reporters you want to run, the resource groups to run them on, how frequently to run them, and the arguments to use when running them.
The default Inca configuration defines a single suite named sampleSuite that contains eight series as shown in Figure 13.
In a new Inca installation, you can add the default suite above by pressing Add button in the Suites section of the panel, entering "sampleSuite" in the pop-up window, then pressing the OK button. To add series to the new suite, press the Add button in the Series section to open the incat series dialog and configure each like the atlas series in Figure 14.
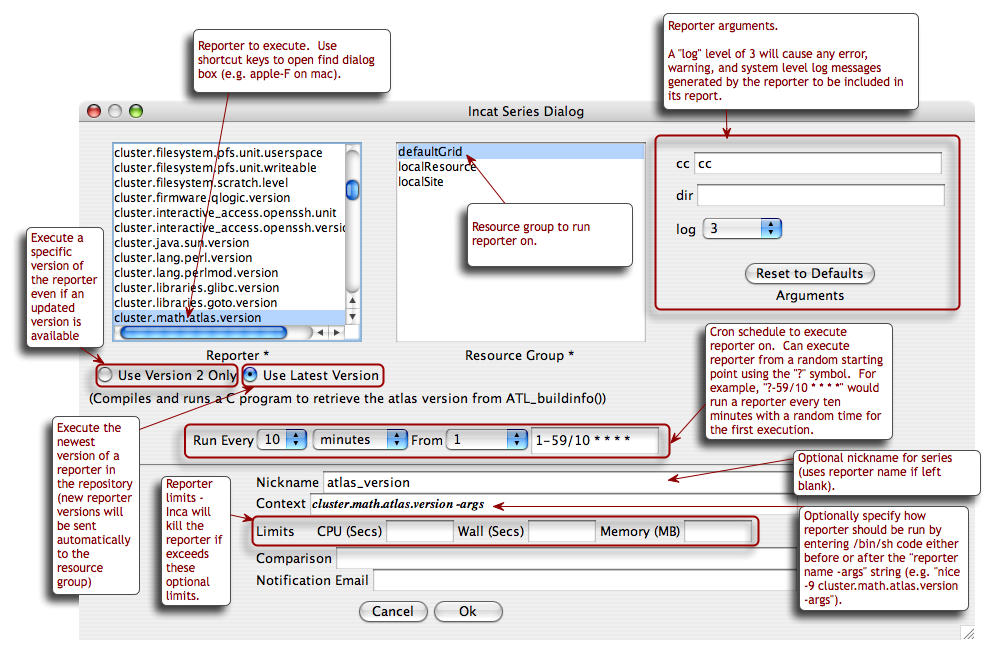
The bottommost two text boxes in the series dialog allow you to test the output of the reporter and send email if the test fails. This is covered in Section 5.8 below; for this series leave these boxes blank. Press the OK button, and incat will close the series dialog box and add the series to the Series list in the suite/series specification panel.
The other seven series in the default Inca configuration are composed similarly to the first one. Press the Add button in the series section for each of them, then set the values in the series dialog as specified in the table below. Set the log argument for each series to 3 and the frequency to 10 minutes.
Table 1. Default Configuration Series
Reporter | Nickname | Arguments |
|---|---|---|
cluster.compiler.gcc.version | gcc_version | |
cluster.security.openssl.version | openssl_version | |
cluster.interactive_access.openssh.version | openssh_version | |
cluster.interactive_access.openssh.unit | openssh_to_localhost | host: localhost; login: inca |
viz.lib.vtk-nvgl.version | vtk-nvgl_version | |
viz.lib.chromium.version | chromium_version | |
cluster.compiler.any.unit | java_hello_world | compiler: javac; lang: java |
5.4. Committing/Saving
Your Inca deployment configuration is now complete. At this point, it's a good idea to use the "Save" option in incat's File menu to write the configuration to a file (Figure 15). That way, you have a local copy of the configuration that you can later modify. The file is formatted XML; if you're curious, you can read through it to see how incat represents the information you've entered.

Although your configuration is complete, it's not yet active. To tell Inca to begin running reporters, you need to have incat send your configuration to your Inca Agent. If you started incat with the -A argument, then you're already connected to your Agent. Otherwise, use the "Connect" option in incat's Agent menu to establish a connection. Once you're connected, you can use the "Commit" option in the Agent menu to send the configuration to the Agent (Figure 16). In response, the Agent will install the Inca Reporter Manager code on the host specified in incat's "Resource Configuration" panel and begin running the reporters you specified in the "Suite Series" panel.

5.5. Resource Access Methods
The Inca Agent can use the following access methods to stage and start Reporter Managers on resources:
manual:
Entering a manual resource group indicates that you want complete, direct control over Inca execution on the group. For a manual resource group you must start the Reporter Manager on the command line and restart it any time you want to change the reporter series configuration for the group. The Agent will NOT automatically start a Reporter Manager for a manual resource as it will for local, ssh, or globus2 resources. For a manual resource group, incat provides a text box for you to enter an email that should be notified when the Inca configuration on the resource needs to be updated.
local:
The Agent starts a Reporter Manager on the same machine where the Agent is running (localhost).
ssh:
The Agent starts a Reporter Manager on a remote machine using ssh to access the remote machine. Reporter Manager files are copied from the Agent to the remote machine using sftp. For ssh resource groups, incat provides text boxes for you to enter the login id, password, and path to the ssh key file on the Agent machine. For security purposes, incat displays asterisks for the password and encrypts it when you save the configuration to a file.
globus2:
The Agent starts a Reporter Manager on a remote machine using globus to access the remote machine. Reporter Manager files are copied from the Agent to the remote machine using GridFtp. When you select globus2 in the Access Method pull-down, incat provides text boxes for you to enter contact information for the resource's Globus Gram and GridFtp servers. If you leave these boxes blank, Inca defaults to ports 2119 and 2811, respectively, for the first host in the resource group's member list. Access to Globus hosts requires an active Globus proxy on the Agent's host. You can either create a manual proxy on the Agent machine before starting, or you can store a proxy on a myproxy server and complete the four incat proxy dialog boxes (see below) so that the Agent can obtain one as needed.
5.6. Proxies
For convenience, the Inca framework can be used to retrieve a proxy for the globus2 access method or for reporters that require an active proxy. Reporters that require a proxy should use the Inca::Reporter::GridProxy module described in Section 7.2.3.
Before configuring Inca to retrieve proxies, first store a proxy on a myproxy server. For information about setting up a myproxy server or storing proxies on a server, please see the official myproxy documentation.
The Agent can automatically retrieve a proxy from a myproxy server if the proxy information is defined in incat as follows:
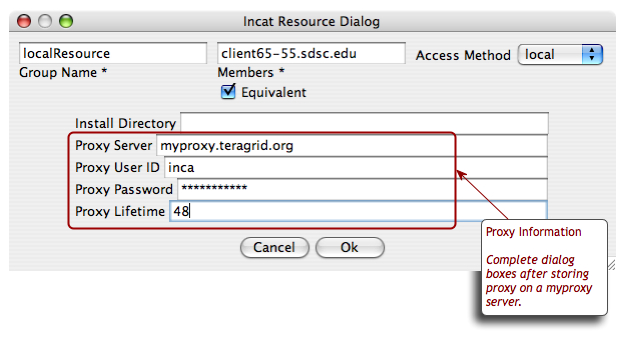
The dialog boxes are the hostname of the myproxy server, the username and password used to store the proxy, and the lifetime in hours that the agent should retrieve a proxy for (the default is 12 hours).
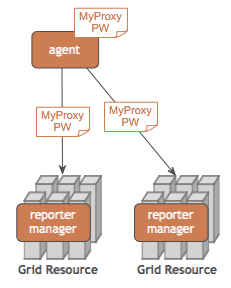
Once proxy information is committed to the agent, it can be retrieved by reporter managers. Each time a reporter manager is ready to run a reporter that needs a proxy it:
requests the MyProxy passphrase from the agent
uses the MyProxy command-line client to retrieve proxy credentials from a MyProxy server
clears the MyProxy passphrase from memory
The MyProxy passphrase is stored on the agent in the $INCA_DIST/var/resources.xml file and is encrypted with the same passphrase as the agent's private key. The MyProxy passphrase passes between the reporter manager and agent over their SSL connection.
5.7. Using Resource Macros
Resource macros provide a shorthand for defining multiple, similar series. For example, suppose you wanted to add three series to the configuration defined above to measure the ping time to three different hosts, named blue.ufo.edu, green.ufo.edu, and red.ufo.edu. One approach would be to define a series for blue, use the Copy button in the Series section of the Suites panel to make two copies, then modify them to ping green and red.
A better approach is to use a macro for the host names and let Inca replicate the series for you. In the Resource Configuration panel, click on defaultGrid in the Resource Group section. Next, press the Add button beneath the Macros section. This opens a dialog box that allows you to enter the name and value(s) of a macro associated with the current resource group. Enter "targets" in the Macro Name text box and "blue green red" in the Macro Value(s) text box, then press OK. The definition of the targets macro now appears in the Macros section of the Resource Configuration panel.
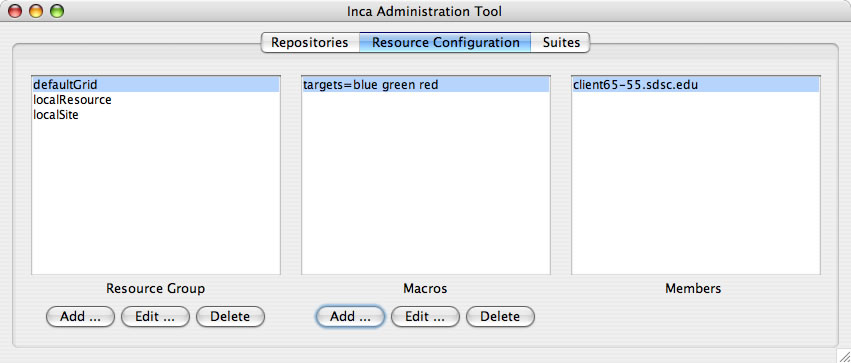
The targets macro is also defined for the other resource groups since the defaultGrid contains all other groups. Macros appear grey if they were defined in a resource group other than the one selected:
To make use of the macro you've defined, click the Suites tab, then press the Add button underneath the Series section to open the series edit dialog. In the dialog, set the reporter to grid.benchmark.performance.ping and the resource group to localResource.
In the host text box in the Arguments section of the dialog, enter "@targets@.ufo.edu". Macro references in incat are indicated by placing a "@" before and after the macro name. When the Inca Agent encounters a macro reference in a series, it makes one copy of the series for each value of the macro. Since the targets macro has three values--blue, green, and red--the Inca Agent will make three copies of this series, substituting a single value for the macro reference in each. In this case that means that you'll have one series with a host argument of "blue.ufo.edu", one with a host argument of "green.ufo.edu", and one with a host argument of "red.ufo.edu".
The inca web pages use the series nickname when displaying series results. If you leave the series nickname with its default value, the name of the reporter, then all three series will have the same nickname. Instead, you can enter "ping_to_@targets@" in the nickname text box. The Inca Agent will expand this reference in parallel with the reference in the host argument, so your three series will have the nicknames ping_to_blue, ping_to_green, and ping_to_red, respectively.

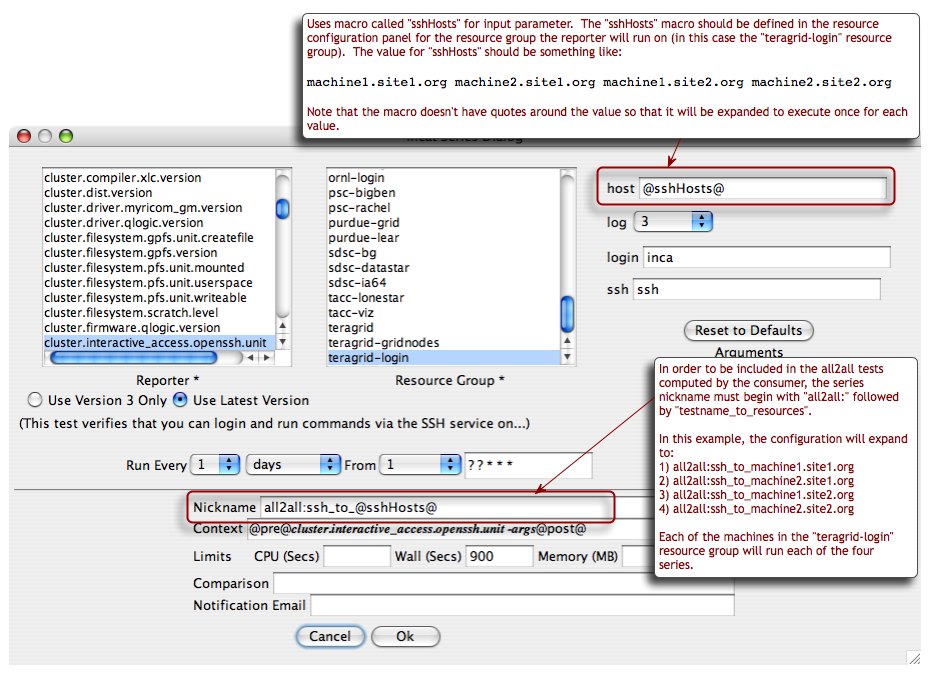
5.7.1. Configuring "all2all" Series Using Macros
As described in Section 6.1, "all2all" test results are calculated by the consumer. The image below illustrates how an "all2all" series would be configured.
5.8. Series Comparison and Notification
For a particular series, the Inca system by default reports only whether or not the series reporter was able to execute successfully--whether a version reporter was able to determine a package version, a unit reporter was able to run a program, etc. Using Inca's comparison and notification feature, you can refine a series to define success more precisely and to receive notification from Inca when a series reporter detects a problem. The bottom two text boxes of the series edit dialog provide access to Inca's comparison and notification feature.
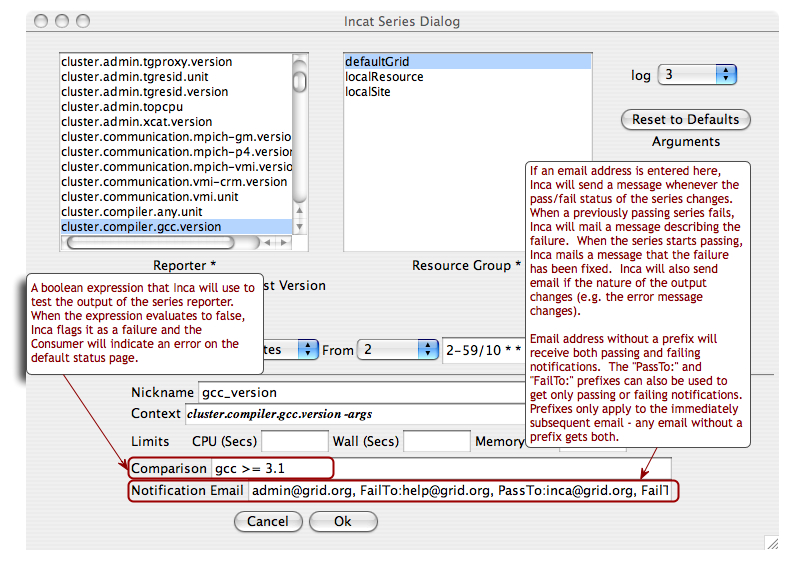
The comparison expression can test the content of the report body, the content of the report error message, or the value of any symbols defined in the report body by <ID> tags. The expression may use any of the boolean operators <, <=, >, >=, ==, and !=, plus perl's pattern match (=~) and mismatch (!~) operators. One simple test would be "body =~ /./", which would test whether the report body contained any characters. Tests can be joined together by the && and || operators. Using these, you could ignore an expected, minor error with the test "body =~ /./ || errorMessage == 'Try again later'".
As mentioned above, you can include symbols defined in the report body in your tests. The Inca system uses the content of any subsequent tag as the symbol value. For example, the body of the output of the gcc version reporter might be
  <body>
    <package>
      <ID>gcc</ID>
      <version>3.1</version>
    </package>
  </body>
|
Here, Inca will use "3.1" as the value of the symbol "gcc". With this output, the comparison test "gcc >= 3.0" would succeed, while the comparison "gcc == 3.0" would fail. If the report body contains an <ID> tag with no subsequent tag, the value of the symbol is defined to be "".
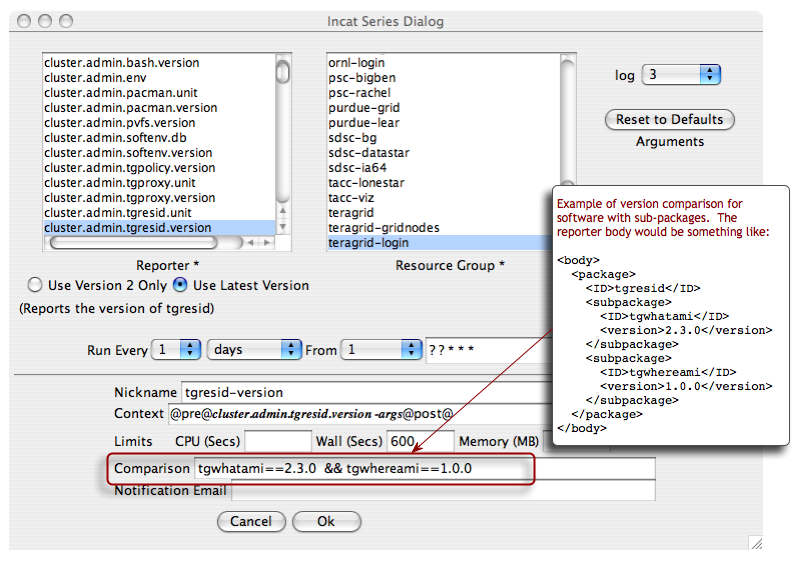
The image below illustrates how a comparison for subpackage versions would be configured.
6. Data Display (Data Consumers)
The data that the Inca depot stores, as with all database data, can be displayed in many ways. A data consumer is anything that retrieves data from the depot and displays it (e.g. a JSP, sql query, CGI, etc.).
Data consumers can query the Inca depot to produce current and historical reports and graphs or customized status information. The Inca depot comes with two pre-defined queries:
given instance and config IDs for a series, returns XML like the following (the results from executing a reporter at a particular point in time)
<reportDetails>
  <suiteId>1</suiteId>
  <seriesConfigId>5</seriesConfigId>
  <seriesId>5</seriesId>
  <reportId>1</reportId>
  <instanceId>73</instanceId>
  <seriesConfig>
     ...
    <nickname>java_hello_world</nickname>
     ...
  </seriesConfig>
  <report>
     ...
  </report>
  <sysusage>
     ...
  </sysusage>
  <stderr/>
</reportDetails>
given a suite name, returns XML like the following (the latest report summaries for all of the series in the particular suite)
<reportSummary>
  <hostname>Computer.local</hostname>
  <uri>http://repository/compiler.any.unit</uri>
  <nickname>java_hello_world</nickname>
  <seriesConfigId>5</seriesConfigId>
  <instanceId>73</instanceId>
  <gmt>2006-12-20T16:00:11.000-08:00</gmt>
  <body>
    <package>
      <ID>openssl</ID>
      <version>0.9.7i</version>
    </package>
  </body>
</reportSummary>
<reportSummary>...</reportSummary>
<reportSummary>...</reportSummary>
6.1. Default Data Consumer
The default data consumer is a Jetty deployed WAR file ($INCA_DIST/etc/inca-consumers.war) that contains a set of JSP pages along with their associated files and stylesheets. Currently the WAR file cannot be deployed outside of the inca consumer server (e.g. in tomcat). The WAR's index.jsp page (http://localhost:8080/index.jsp) allows its user to choose "suiteName" and "resourceID" parameters for a second JSP page called xslt.jsp. The xslt.jsp script retrieves XML (partly from the second pre-defined query shown above) and formats it with an XSL stylesheet if the script is passed the name of a stylesheet as an input parameter. The default data consumer redirects to the xslt.jsp script and adds an input parameter with an XSL stylesheet so the result is formatted html (i.e. index.jsp redirects to something like http://localhost:8080/inca/xslt.jsp?suiteName=sampleSuite&resourceID=defaultGrid&xmlFile=swStack.xml&xsl=default.xsl).
To view the XML that is retrieved and formatted by the xslt.jsp script, remove its XSL parameter. For example, http://localhost:8080/inca/xslt.jsp?suiteName=sampleSuite&resourceID=defaultGrid&xmlFile=swStack.xml would produce something similar to:
<all2allSummaries> (cross-site test results calculated by the consumer):
The default installation doesn't include cross-site tests; this section will be empty unless the Inca admin creates all2all series in incat. Cross-site, or "all to all", tests determine whether all resources in a Grid can reach all other resources (e.g. via gsissh, gram, gridftp). To be included in cross-site test calculation, a series must be assigned a nickname like "all2all:x_to_y" in incat. Cross-site failures are calculated differently than regular failures. For example, resource A will not be assigned a failure trying to reach resource B if all other resources trying to reach resource B also fail (i.e. there is a problem with resource B not resource A). Section 5.7.1 describes how to configure all2all tests in incat.
<all2allSummaries xmlns="http://inca.sdsc.edu/dataModel/all2all_2.0">
  <resources xmlns="">
    <resource>
      <name>localResource</name>
      <testSummaries>
        <testSummary>
          <name>gridftp</name>
          <numSuccesses>15</numSuccesses>
          <numAtFaultFailures>0</numAtFaultFailures>
          <numNotAtFaultFailures>1</numNotAtFaultFailures>
          <failures/>
        </testSummary>
        <testSummary>
          <name>gram</name>
          <numSuccesses>13</numSuccesses>
          <numAtFaultFailures>1</numAtFaultFailures>
          <numNotAtFaultFailures>0</numNotAtFaultFailures>
          <failures>
            <failure>
              <nickname>all2all:gram_to_localResource</nickname>
              <instanceId>239352</instanceId>
              <seriesConfigId>172057</seriesConfigId>
            </failure>
          </failures>
        </testSummary>
      </testSummaries>
    </resource>
  </resources>
</all2allSummaries>
<suite> (from xslt.jsp "suiteName" parameter):
Array of report summaries for the suite. This part of the XML is retrieved from the pre-defined depot query that takes a suite name and returns summaries for the latest series instance in that suite.
<suite>
 <reportSummary>
  <hostname>host1.name</hostname>
  <uri>http://repository/globus.unit.xio</uri>
  <nickname>gt4-xio</nickname>
  <seriesConfigId>115446</seriesConfigId>
  <instanceId>118115</instanceId>
  <gmt>2006-11-16T23:49:49.000-08:00</gmt>
  <body/>
 </reportSummary>
 <reportSummary>
  <hostname>host2.name</hostname>
  <uri>http://repository/globus.unit.xio</uri>
  <nickname>gt4-xio</nickname>
  <seriesConfigId>115466</seriesConfigId>
  <instanceId>219103</instanceId>
  <gmt>2006-12-15T01:31:53.000-08:00</gmt>
  <body>
    <unitTest>
      <ID>xioTest</ID>
    </unitTest>
  </body>
 </reportSummary>
</suite>
<resourceConfig> (from xslt.jsp "resourceID" parameter):
Array of all resources within a given resource group and their macros. This part of the XML is retrieved from the agent.
<resourceConfig>
  <resources>
    <resource>
      <name>localResource</name>
      <macros>
        <macro>
          <name>__regexp__</name>
          <value>host.sitea.org</value>
        </macro>
      </macros>
    </resource>
  </resources>
</resourceConfig>
extra xml (from xslt.jsp "xmlFile" parameter):
XML from the file passed as the xslt.jsp xmlFile parameter. The default file is $INCA_DIST/etc/common/swStack.xml, but any XML file in the $INCA_DIST/etc/common directory can be passed as the xslt.jsp xmlFile parameter and it will automatically be picked up by the data consumer.
<stack>
    <id>Software and Services</id>
    <category>
        <id>Math Libraries</id>
        <package>
            <id>globus</id>
            <version>4.0.1</version>
            <tests>
                <version>
			     <id>gt4-version</id>
		       </version>
                <unitalias>
			     <id>gt4-xio</id>
		       </unitalias>
                <unitalias>
			     <id>all2all:gram_to_localResource</id>
		       </unitalias>
            </tests>
        </package>
    </category>
</stack>
To change the XML to HTML transformation, either edit the default XSL stylesheet ($INCA_DIST/etc/default.xsl for the summary page or $INCA_DIST/etc/instance.xsl for the report detail pages), or pass another XSL file in the $INCA_DIST/etc directory as the xslt.jsp "xsl" parameter (e.g. $INCA_DIST/etc/swStack.xsl). [ xsl tutorial ]
Change default CSS (Cascading Style Sheet) properties such as colors and fonts by editing the $INCA_DIST/var/jetty/webapp/css/inca.css file. [ css tutorial ]
6.2. Non-default Data Consumer Installation
You can install the data consumer in a non-default location (e.g. on a machine where the depot and agent are not running) if you:
Copy the incaInstall.sh script to the machine where the consumer will run.
% wget http://inca.sdsc.edu/releases/2.01/incaInstall.sh
Install consumer on the new machine:
% ./incaInstall.sh $INCA_DIST consumers
Copy the consumer key, certificate, and trusted directory from the machine where the agent/depot are running (orig.machine) to the new machine:
% scp orig.machine:$ORIG_INCA_DIST/etc/consumerkey.pem $INCA_DIST/etc/; \
scp orig.machine:$ORIG_INCA_DIST/etc/consumercert.pem $INCA_DIST/etc/;
scp "orig.machine:$ORIG_INCA_DIST/etc/trusted/*" $INCA_DIST/etc/trusted/;
Edit the $INCA_DIST/etc/common/inca.properties local file and specify the full hostname of the machine where the agent and depot are running:
114 inca.consumer.agent=incas://agent.hostname:6323
...
128 inca.consumer.depot=incas://depot.hostname:6324
Start the consumer component on the new machine:
% cd $INCA_DIST; ./bin/inca start consumer
7. Reporters and Repositories
Inca reporters are executable programs and scripts, generally small, that test and report the health and characteristics of a system. The figure below illustrates a typical Inca installation where reporters are retrieved from a repository and sent to Reporter Managers on Grid resources by the Agent. The Reporter Managers then execute the reporters based on series configuration from the Agent and send the XML reports to the Depot for storage.
7.1. Executing Reporters
Because they are executables, Inca reporters are independent of the rest of the Inca system. Reporters can be executed manually from a command line or automatically as part of an Inca installation. Incorporating your own reporters into a running Inca installation requires only writing the reporters (Section 7.2), including them in a repository (Section 7.3), and configuring the repository's series using incat (Section 5). Most developers will execute reporters from the command line before adding them to their Inca installation. After installing Inca, you can try executing some of the reporters that come with the distribution from the command line:
% cd $INCA_DIST/Inca-Reporter-*/bin % setenv PERL5LIB ../lib % ./cluster.compiler.gcc.version |
All Inca reporters must support the command line arguments listed in the table below. In addition, a reporter may support additional command line arguments specific to that reporter's task.
Table 2. Reporter Command Line Arguments
Argument | Valid Values | Default Value | Description |
|---|---|---|---|
-help | yes|no | no | Do not run the reporter; instead, print information on running it. If the value of the verbose argument is 0, this information will be readable text; otherwise, it will be reporter XML. |
-log | 0-5|debug|error|info|system|warn | 0 | Include reporter log messages in the reporter output. The named argument values indicate specific types of log messages that should be included. 0 indicates no log messages should be included; the other numeric values indicate error, warn, system, info, and debug messages, cumulatively. For example, --log=2 indicates both error and warn messages should be included, while --log=4 includes error, warn, system, and info messages. |
-verbose | 0-2 | 1 | Determine what the reporter prints. A verbose level of 0 indicates that the reporter prints only 'completed' or 'failed', depending on the outcome of its testing. Verbose level 1 produces XML that reports the testing result, and verbose level 2 adds additional tags to this XML to give instructions on running the reporter. |
-version | yes|no | no | Do not run the reporter; instead, print its version number. |
Executing a reporter using different arguments:
% ./cluster.compiler.gcc.version -log=3 % ./cluster.compiler.gcc.version -help=yes -verbose=0 % ./cluster.compiler.gcc.version -version=yes |
7.2. Writing Reporters
Reporters can be written in any language as long as they output XML according to the schema described in Section 7.2.1. New reporter developers may choose to write reporters in Perl since the Inca distribution includes sample Perl reporters and API modules (Section 7.2.3) for printing XML according to our schema.
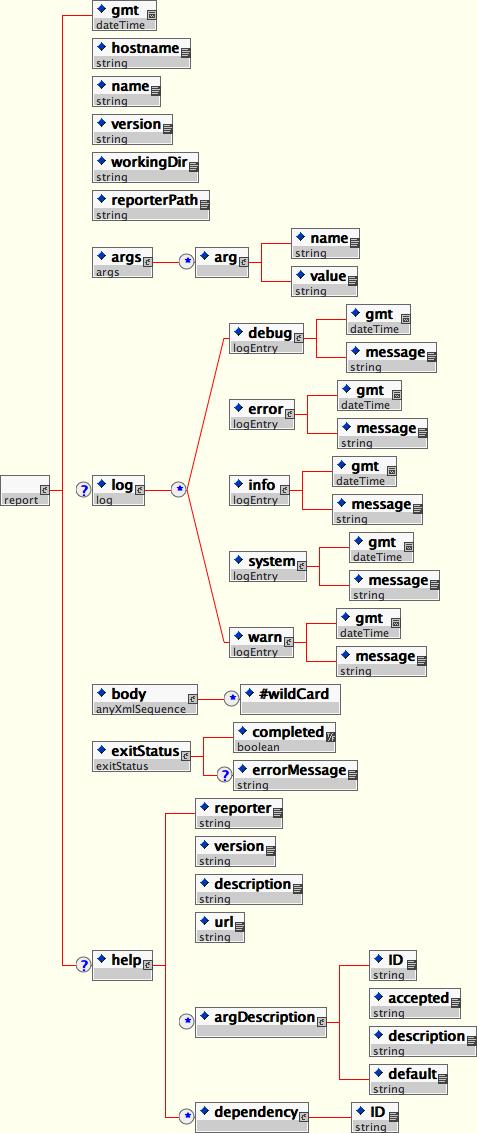
7.2.1. Reporter XML Schema
In order to promote interoperability between reporters, we define a specification for how reporter output should be formatted. Given the wide acceptance and availability of tools for XML, the specification requires that reporter output should be formatted using XML. Furthermore, we specify a basic schema that the XML should follow so that we can handle the output in a general manner. The goal of this schema is to be flexible enough to express a wide variety of data.
Our approach is to require a number of XML fields which provide metadata about the output and define one of the fields, body, to be abstract. The body field is a placeholder for the formatted output and can be replaced by any XML substitution group thereby allowing this schema to accommodate a large variety of output. In other words, the basic schema is like an abstract class and the substitution groups provide for subclassing.
The reporter schema is visualized in Figure 17.
7.2.2. Reporter XML Output
Here is the output from the successful run of a typical Inca reporter. The content and meaning of the XML tags is described below.
Figure 18. Example of Reporter Output
<?xml version='1.0'?>
<inca:report xmlns:inca='http://inca.sdsc.edu/dataModel/report_2.1'>
  <gmt>2006-11-17T17:35:40Z</gmt>
  <hostname>jhayes-Computer.local</hostname>
  <name>cluster.compiler.gcc.version</name>
  <version>2</version>
  <workingDir>/Users/jhayes/Inca/subversion/inca/trunk/devel/reporters/bin</workingDir>
  <reporterPath>cluster.compiler.gcc.version</reporterPath>
  <args>
    <arg>
      <name>help</name>
      <value>no</value>
    </arg>
    <arg>
      <name>log</name>
      <value>0</value>
    </arg>
    <arg>
      <name>verbose</name>
      <value>1</value>
    </arg>
    <arg>
      <name>version</name>
      <value>no</value>
    </arg>
  </args>
  <body>
    <package>
      <ID>gcc</ID>
      <version>3.3</version>
    </package>
  </body>
  <exitStatus>
    <completed>true</completed>
  </exitStatus>
</inca:report> |
As shown in Figure 18, reporter output begins with an XML preamble and it surrounded by <report> tags. A prefix with a tag name that references http://inca.sdsc.edu/dataModel/report_2.1, which is the namespace that defines the report schema, can also be used.
The following tags are defined within a <report>:
- gmt
the time the reporter ran (ISO 8601 format)
- hostname
host where reporter ran
- name
reporter name
- version
reporter version number
- workingDir
directory where reporter execution begins
- reporterPath
local path to reporter file
- args
args must contain an arg name/value entry for every argument the reporter supports, including those for which the reporter supplies a default value (help, log, verbose, version)
- log
OPTIONAL TAG (not shown in Figure 18 report). Log entries produced by the reporter. This tag contains one or more <debug>, <error>, <info>, <system>, and/or <warn> tags, each of which gives the text of the message and the time it was produced. Here is a typical example of a log section:
<log> <system> <gmt>2006-11-17T18:28:10Z</gmt> <message>grid-proxy-info 2>&1</message> </system> <debug> <gmt>2006-11-17T18:28:10Z</gmt> <message>Checking for grid proxy: Result of command "grid-proxy-info": sh: line 1: grid-proxy-info: command not found </message> </debug> <error> <gmt>2006-11-17T18:28:10Z</gmt> <message>ERROR: Valid proxy needed for file transfer.</message> </error> </log>- body
The body tag contains the results of the reporter testing. The only requirement for the contents of this tag is that they must be well-formed XML--tags balanced and no extraneous <, >, and & characters. Figure 18 shows the conventional body for version reporters.
- exitStatus
Includes the boolean <completed> tag, indicating whether or not the reporter successfully completed its testing, and the optional <errorMessage> tag, which contains a string indicating why the reporter failed to complete.
- help
OPTIONAL TAG (not shown in Figure 18 report). The help tag describes the reporter and how to run it. Contents include the reporter name, version, description, and url, detailed descriptions of each argument, and an optional list of dependencies that the reporter has on other packages. For example, here is the <help> section for the gcc version reporter.
  <help>
    <ID>help</ID>
    <name>cluster.compiler.gcc.version</name>
    <version>2</version>
    <description>Reports the version of gcc</description>
    <url>http://gcc.gnu.org</url>
    <argDescription>
      <ID>help</ID>
      <accepted>no|yes</accepted>
      <description>display usage information (no|yes)</description>
      <default>no</default>
    </argDescription>
    <argDescription>
      <ID>log</ID>
      <accepted>[012345]|debug|error|info|system|warn</accepted>
      <description>log message types included in report</description>
      <default>0</default>
    </argDescription>
    <argDescription>
      <ID>verbose</ID>
      <accepted>[012]</accepted>
      <description>verbosity level (0|1|2)</description>
      <default>1</default>
    </argDescription>
    <argDescription>
      <ID>version</ID>
      <accepted>no|yes</accepted>
      <description>show reporter version (no|yes)</description>
      <default>no</default>
    </argDescription>
    <dependency>
      <ID>Inca::Reporter</ID>
    </dependency>
    <dependency>
      <ID>Inca::Reporter::Version</ID>
    </dependency>
  </help>
7.2.3. Reporter APIs
The Inca release includes a set of Perl modules that make it easier to develop reporters that produce output as shown in Section 7.2.2 and conform to the schema described in Section 7.2.1. The following are a list of modules and their purpose (click on module names for manpages):
This module is the general reporter API and is the base class for all types of reporters. Inca::Reporter automates determination of hostname, gmt, reporter name, etc., handles command-line parsing, provides an interface for log messages, and handles XML generation.
The Inca::Reporter::GlobusUnit module is used for Globus unit tests. This package provides methods for running Globus jobs.
The Inca::Reporter::GridProxy package is a pseudo-module indicating that a reporter requires a proxy credential in order to execute. The following is an example of a reporter that requires a proxy:
#!/usr/bin/env perl use strict; use warnings; use Inca::Reporter::SimpleUnit; my $reporter = new Inca::Reporter::SimpleUnit( name => 'grid.middleware.globus.unit.proxy', version => 2, description => 'Verifies that user has valid proxy', url => 'http://www.globus.org/security/proxy.html', unit_name => 'validproxy' ); $reporter->addDependency( "Inca::Reporter::GridProxy" ); $reporter->processArgv(@ARGV); # check to see if proxy has enough time left $reporter->log( 'info', "X509_USER_PROXY=$ENV{X509_USER_PROXY}" ); my $output = $reporter->loggedCommand('grid-proxy-info -exists -hours 4 2>&1'); if( $? != 0 ) { $reporter->unitFailure("grid-proxy-info failed: $! $output"); } else { $reporter->unitSuccess(); } $reporter->print();The Inca::Reporter::Performance module is used to gather system performance metrics. This package defines a common <body> schema for system/software performance metric reporters and produces a collection of benchmarks, each a set of parameters (name/value) and statistics (name/value/units). For a single benchmark, the Inca::Test::Reporter::Performance::Benchmark module is also available.
The Inca::Reporter::SimpleUnit module is used for software unit tests. This package defines a common <body> schema for unit test reporters and provides methods for recording results of unit tests.
The Inca::Reporter::Usage module is used for creating simple usage reports.
The Inca::Reporter::Version module is used for reporting software versions. This package defines a common <body> schema for version reporters, offers support for subpackage versions, and provides convenience methods for common ways of determining version.
The following is the Perl code for a reporter that produces output like Figure 18. This reporter uses the Inca::Reporter::Version module to determine the version of gcc. Examples of reporters that use the other Perl modules are located in $INCA_DIST/Inca-Reporter-*/bin.
#!/usr/bin/env perl

use strict;
use warnings;
use Inca::Reporter::Version;

my $reporter = new Inca::Reporter::Version(
  name => 'cluster.compiler.gcc.version',
  version => 2,
  description => 'Reports the version of gcc',
  url => 'http://gcc.gnu.org',
  package_name => 'gcc'
);
$reporter->processArgv(@ARGV);

$reporter->setVersionByExecutable('gcc -dumpversion');
$reporter->print(); |
7.3. Reporter Repositories
The Inca system retrieves reporters from external collections called repositories. A reporter repository is simply a file directory, accessed via a file: or http: URL, that contains a catalog file named Packages.gz. This gzipped file includes a sequence of name:value attribute pairs for every reporter and support package in the repository; blank lines separate the attributes for different reporters. For example, here is a portion of the Packages.gz file for the Inca standard reporter repository.
arguments: help no|yes no;log [012345]|debug|error|info|system|warn 0;verbose [0 12] 1;version no|yes no dependencies: Inca::Reporter;Inca::Reporter::Version description: Reports the version of tgusage file: cluster.accounting.tgusage.version name: cluster.accounting.tgusage.version url: http://www.teragrid.org version: 2 arguments: help no|yes no;log [012345]|debug|error|info|system|warn 0;verbose [0 12] 1;version no|yes no dependencies: Inca::Reporter;Inca::Reporter::SimpleUnit description: ant hello world test file: cluster.admin.ant.unit name: cluster.admin.ant.unit version: 3 arguments: help no|yes no;log [012345]|debug|error|info|system|warn 0;verbose [0 12] 1;version no|yes no dependencies: Inca::Reporter;Inca::Reporter::Version description: Reports the version of Apache Ant file: cluster.admin.ant.version name: cluster.admin.ant.version version: 2 |
Of the attributes shown, only file and name are required. The file attribute gives the relative path to the reporter file, and the name attribute specifies the unique package name of the reporter. If the reporter requires support packages to execute, it should include a dependencies attribute with a semicolon-separated list of package names. The incat administration tool uses the Packages.gz file's arguments and description attributes as part of its series edit dialog. The value of the arguments attribute is a semicolon-separated list giving the name, value pattern, and default value, if any, for each supported command-line argument.
To create a local repository for your own reporters, you only need to collect them into a directory and create a Packages.gz in that directory. The default Inca installation has a Packages.gz file in $INCA_DIST/Inca-Reporter-* that can be added in incat. Inca also supplies a web accessible repository that can be added in incat as "http://inca.sdsc.edu/repository/latest/".
The Inca distribution includes a perl script, incpack, that can create Packages.gz for you. Simply run incpack with a list of reporters that you want to include in Packages.gz, e.g.,
perl incpack jade.version f77.unit vim.version |
incpack runs each of the listed reporters with --help=yes --verbose=1 to extract a standard set of attributes. If your reporters use the Inca reporter perl modules, you might need to run incpack with a -I switch to specify the location of the Inca perl library, like this.
perl incpack -I ${INCA_DIST}/lib jade.version f77.unit vim.version |
7.4. Updating Reporter Repositories
The Inca agent will detect changes to your reporter repository and automatically send changes to the appropriate reporter managers if you:
update the reporter version number (ie. change a line like "version => 1" to "version => 2" in the body of the reporter)
make sure the reporter permissions are set so the agent can fetch the reporter (755 is the standard reporter permission)
update your Packages.gz file using incpack. The command will be something like:
% cd $INCA_DIST/Inca-Reporter-*; ./sbin/incpack -I lib bin/<reportername>
wait for the agent to deploy the new reporter automatically (it looks for new reporters every four hours by default),
*OR*
restart the agent,
*OR*
go to the reporter panel in incat and delete your repository URL and commit and then readd the repository URL and commit. Readding the repository URL will force the agent to send out the new reporters. This option is usually less disruptive than restarting the agent.
If the revised reporter still isn't deployed, look for any errors in the $INCA_DIST/var/agent.log that indicate the agent was unable to fetch the reporter or skipped over updating it. Make sure there is an active series that uses the reporter with "use latest version" checked on the resource your intend it to run on incat. Look for $INCA_DIST/var/repository/repository.xml entries for the reporter with "<latestVersion>false</latestVersion>" (should be "<latestVersion>true</latestVersion>" to get the updated reporters).
8. Inca Client APIs
Currently, we provide Perl and Java client APIs to the Inca agent and depot.
9. Web Services
To access Inca from a Web services API, you will need to install the Inca web services component, incaws.
% sh incaInstall.sh $INCA_DIST incaws |
The results should look similar to:
Retrieving http://inca.sdsc.edu/releases/latest/Inca-WS.tar.gz
--12:59:23--  http://inca.sdsc.edu/releases/latest/Inca-WS.tar.gz
           => `Inca-WS.tar.gz'
Resolving inca.sdsc.edu... 198.202.75.28
Connecting to inca.sdsc.edu|198.202.75.28|:80... connected.
HTTP request sent, awaiting response... 200 OK
Length: 1,226,347 (1.2M) [application/x-tar]

100%[====================================>] 1,226,347     --.--K/s

12:59:23 (81.68 MB/s) - `Inca-WS.tar.gz' saved [1226347/1226347]

Unpacking http://inca.sdsc.edu/releases/latest/Inca-WS.tar.gz
Inca-WS-1.6421/
Inca-WS-1.6421/lib/
...
Inca-WS-1.6421/etc/IncaWS.wsdl
Inca-WS-1.6421/version.svn
Will install Inca prerequisite Net::SSLeay
Will install Inca prerequisite IO::Socket::SSL
Will install Inca prerequisite Expat
Will install Inca prerequisite LWP::UserAgent
Will install Inca prerequisite MIME::Base64
Will install Inca prerequisite SOAP::Lite
Writing Makefile.perl.inc for Inca-WS
Inca-WS installed |
To start incaws, specify the port, credentials, and hostname/port for the Inca agent and depot as below. Replace "origHost", "agentHost" and "depotHost" with the correct names for your installation.
% cd $INCA_DIST; ./bin/inca incaws --auth=yes --cert=etc/agentcert.pem --key=etc/agentkey.pem --trusted=etc/trusted/origHostcert.pem --port=8001 --password=yes depotHost:6324 agentHost:6323 enter password (no prompt displayed) |
Check to make sure the incaws is running on port 8001:
% netstat -an | grep 8001 tcp4 0 0 *.8001 *.* LISTEN |
The WSDL file for the incaws component is in $INCA_DIST/etc/IncaWS.wsdl. The following table summarizes the available functions.
Table 4. Web services functions
Function | Description |
|---|---|
getCatalog( [$url] ) | Asks the agent to retrieve and return the package catalog from the reporter repository accessed via $url. An undefined $url indicates that the agent should return a merged catalog for all known repositories. |
getConfig() | Asks the agent to return XML for the Inca deployment configuration. |
pingAgent() | Check that the Inca agent is accessible. |
pingDepot() | Check that the Inca depot is accessible. |
queryGuids() | Asks the depot to return a space-separated list of known suite guids. |
queryHql($hql) | Asks the depot use the HQL select statement $hql to extract and return information from the DB. On success, returns a reference to an array that contains the objects selected by the select statement. |
queryInstance($instanceId, $configId) | Asks the depot to report details about one particular invocation of a reporter. $instanceId is the DB id of the instance for the invocation; $configId the related series configuration DB id. On success, returns a reference to a single-element array that contains a ReportDetails document describing the instance. |
querySeries($configId) | Asks the depot to retrieve information about all instances related to the series configuration identified by $configId. On success, returns a reference to an array that contains a set of ReportDetail documents related to the series. |
querySuite($guid) | Asks the depot to retrieve information about all the series of the suite identified by $guid. On success, returns a reference to an array that contains a set of ReportSummary documents related to the series configurations of the suite. |
Below shows an example of how to access the Inca web services from Perl using SOAP::Lite.
use SOAP::Lite;
use Cwd;

my $cwd = getcwd();
my $ws = SOAP::Lite->service("file:$cwd/etc/IncaWS.wsdl");

# check agent and depot are available
print $ws->pingAgent('hello agent'), "\n";
print $ws->pingDepot('hello depot'), "\n";

# get the Inca configuration
print $ws->getConfig(), "\n";
my $guid = $ws->queryGuids();

# get the latest instances of a suite
my $results = $ws->querySuite( $guid );
for my $result ( @{$results} ) {
  print $result;
} |
Place the above code in a file called $INCA_DIST/sampleWS.pl and set the environment variable PERL5LIB to $INCA_DIST/lib/perl. Then type,
perl sampleWS.pl |
When run against the default installation, the results should look similar to below.
hello agent
hello depot
<inca:inca xmlns:inca="http://inca.sdsc.edu/dataModel/inca_2.0"><repositories><repository>http://inca.sdsc.edu/repository/latest</repository></repositories><resourceConfig>
  <resources>
    <resource>
        <name>defaultGrid</name>
        <xpath>//resource[matches(name, "localSite")]</xpath>
      <macros>
 ...
  </resources>
  </resourceConfig><suites><suite><seriesConfigs><seriesConfig>
              <series>
                  <name>cluster.math.atlas.version</name>
                  <uri>http://inca.sdsc.edu/repository/latest/bin/cluster.math.atlas.version</uri><args>
                      <arg><name>cc</name><value>cc</value></arg>
                      <arg><name>dir</name><value/></arg>
                      <arg><name>help</name><value>no</value></arg>
                      <arg><name>log</name><value>3</value></arg>
                      <arg><name>verbose</name><value>1</value></arg>
             </cron></schedule>
              <action>add</action>
          </seriesConfig></seriesConfigs><name>sampleSuite</name><guid>incas://rocks-101.sdsc.edu:6323/sampleSuite</guid><description/><version>1</version></suite></suites></inca:inca>

<reportSummary xmlns="http://inca.sdsc.edu/queryResult/reportSummary_2.0">
  <hostname xmlns="">localResource</hostname>
  <uri
xmlns="">http://inca.sdsc.edu/repository/latest/bin/cluster.math.atlas.version</uri>
  <nickname xmlns="">atlas_version</nickname>
  <seriesConfigId xmlns="">1</seriesConfigId>
  <instanceId xmlns="">24</instanceId>
  <gmt xmlns="">2007-02-01T13:21:01.000-08:00</gmt>
  <body xmlns:rep="http://inca.sdsc.edu/dataModel/report_2.1" xmlns=""/>
  <errorMessage xmlns="">Cannot locate ATLAS installation; use
-dir</errorMessage>
</reportSummary>
... |
10. Security
By default, inca components use ssl to communicate with each other. Credentials are automatically generated with the "bin/inca createauth" command described in step 4 of the quickstart guide. The createauth command creates keys and certificates for each inca component (the agent, depot, consumer and incat) and stores them in the $INCA_DIST/etc directory.
Inca can also be run without ssl communication (credentials then do not need to be created with the "createauth" command). To turn off ssl communication, edit the $INCA_DIST/etc/common/inca.properties file as follows:
replace all instances of "incas" with "inca"
change these lines to turn authentication off:
9 # To turn authentication (i.e., SSL communication) off and on
10 inca.agent.auth=false
11 #inca.agent.auth=true
...
67 # To turn authentication (i.e., SSL communication) off and on
68 inca.depot.auth=false
69 #inca.depot.auth=true
...
110 # To turn authentication (i.e., SSL communication) off and on
111 inca.consumer.auth=false
112 #inca.consumer.auth=true
11. Log Files
The agent, depot and consumer logs are located in the $INCA_DIST/var directory. Reporter manager logs are located in each manager's install directory under the var directory (e.g. ~/incaReporterManager/var).
Logging is informational by default, but can be adjusted to be more verbose ('info' to 'debug') or less verbose ('info' to 'error') by editing the $INCA_DIST/etc/common/log4j.properties file and then restarting inca components. Note that passwords are logged when 'debug' logging is turned on. Logging for the inca components can be adjusted by editing lines 26 and 27 ("log4j.rootLogger=info, stdout" and "log4j.logger.edu.sdsc.inca=info"). To log the most verbose globus error messages change line 33 in log4j.properties from "log4j.logger.org.globus=error" to "log4j.logger.org.globus=debug".
If a reporter manager is not started on a resource after you have scheduled reporters to run there, it is likely the build on that resource failed. You can confirm by looking for "Unable to stage reporter manager to " in $INCA_DIST/var/agent.log. If found, look for errors on the resource in the 2 build log files from the reporter manager build attempt: ~/incaReporterManager/build.log and ~/incaReporterManager/Inca-ReporterManager-*/build.log. The most common build failure is a bad build of the dependency Net::SSLeay which is required for secure communication; the build for Net::SSLeay will fail if it is unable to find OpenSSL on the resource.
12. Advanced Configuration
This section describes advanced configuration options such as installing components in non-default locations and changing other default properties.
12.1. Inca Component Options
Each inca component has a set of options that can be set in either the $INCA_DIST/etc/common/inca.properties file or from the command line. The inca.properties file has a list of name value pairs of the format "inca.component.property=value". For example, to start the consumer on port 8082 instead of 8080 and enter the password on the command line rather than get it from standard in, you could:
edit $INCA_DIST/etc/common/inca.properties and replace:
"#inca.consumer.port=8080" with "inca.consumer.port=8082"
"inca.consumer.password=stdin:password>" with "inca.consumer.password=pass:<password>" (where <password> is the password set with the createauth command)
execute:
% cd $INCA_DIST; ./bin/inca start consumer
OR execute the following command:
% cd $INCA_DIST; ./bin/inca start consumer -p 8082 -P pass:<password>
Man pages with component options are described in Section 13.
Note: if you have more than 5 reporter managers running, increase the number of agent and depot threads in the inca.properties file to be 10 more than the number of reporter managers. For example, if running 15 reporter managers edit the inca.properties file as follows:
31 # Maximum number of threads running on the agent 32 inca.agent.numthreads=25 ... 82 # Maximum number of threads running on the depot 83 inca.depot.numthreads=25 |
12.2. Depot Database Configuration
The Inca depot uses Hibernate to interface to a relational database backend for storing reports and incat configuration. By default, the Inca depot uses Hibernate's HSQL database but can be configured to use any Hibernate supported database. We have tested the Inca depot with PostgreSQL and Oracle.
Steps for using a depot database other than HSQL are as follows:
Stop the depot
% cd $INCA_DIST; ./bin/inca stop depot
Edit $INCA_DIST/etc/hibernate.properties
Comment out the first 5 lines which specifies for hibernate to use hsql as its backend database:
1 #hibernate.dialect=org.hibernate.dialect.HSQLDialect
2 #hibernate.connection.driver_class=org.hsqldb.jdbcDriver
3 #hibernate.connection.url=jdbc:hsqldb:test
4 #hibernate.connection.username=sa
5 #hibernate.connection.password=
Uncomment the block which specifies for hibernate to use your database (i.e., for PostgreSQL uncomment 8-13, for MySQL uncomment 17-21, for Oracle uncomment 24-28).
Change the uncommented hibernate.connection.url, hibernate.connection.username and hibernate.connection.password property values to be the host/db name, login username and password for your database.
Put JDBC drivers for your database in the $INCA_DIST/lib directory. Driver download locations: PostgreSQL, MySQL, Oracle
Initialize the depot (set up the Inca tables):
You should see something like:% cd $INCA_DIST; ./bin/inca depot -d
Initializing c3p0 pool...
...
Database Initialization Completed
Start the depot
% ./bin/inca start depot
12.3. Manual Access Method
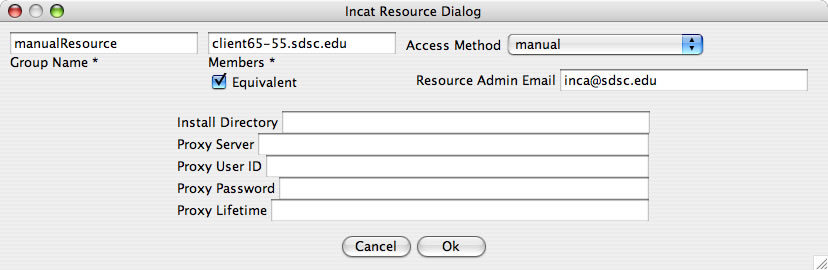
A resource administrator may prefer to have local control of the reporter manager running on their resources rather than be controlled centrally by the Inca agent (similar to Inca 1). In this case, an Inca administrator can add the resource using the access method 'manual' and changes to the configuration will be emailed to the resource administrator. The following steps will need to be taken by the Inca administrator and resource administrator:
Inca Administrator
| Step 1: Add resource in incat with access method 'manual' |
Resource Administrator
| Step 2: Install reporter manager |
| Step 3: Start and manually manage reporter manager |
The Inca administrator will add the specified resource within incat and choose 'manual' as below:
The "Resource Admin Email" field should be filled with the email address of the resource administrator of the manual resource. When suite changes are committed in incat, the agent will email the suite changes to the resource administrator. Select "Agent->Commit" from the menu to commit the changes. A set of credentials (e.g., rmcert.pem, rmkey.pem, trusted) will be generated in $INCA_DIST/var/rm/<resource name>/ such as below:
These credentials will need to be given to the resource administrator in order to send reports to the depot. The rmkey.pem will be encrypted with the same password as the agent's private key. It is recommended that you change the password before giving them to the resource system administrator using the following commands:% ls var/rm/manualResource/ catalog.xml rmcert.pem rmkey.pem trusted% openssl rsa -in rmkey.pem -out rmkey.pem2 -des read RSA key Enter PEM pass phrase: agent-passphrase writing RSA key Enter PEM pass phrase: new-passphrase Verifying password - Enter PEM pass phrase: new-passphrase % mv rmkey.pem2 rmkey.pemGive the reporter manager credentials to the resource system administrator and instruct them to follow steps 2 and 3.
The resource administrator will install the reporter manager distribution on their resource using the following steps:
Create an installation directory for the reporter manager (e.g., $RM_INSTALL_DIR) and change to that directory.
Download reporter manager tarball
Download reporter manager build script
Contact your Inca administrator for a set of credentials. You should receive files called rmcert.pem, rmkey.pem, and trusted*.pem. Place them in $RM_INSTALL_DIR as is. At this point the directory on the remote machine should look something like this:
% ls
Inca-ReporterManager.tar.gz    rmcert.pem    trusted0.pem
buildRM.sh                     rmkey.pem     trusted1.pem
Run 'bash buildRM.sh -u false $RM_INSTALL_DIR Inca-ReporterManager.tar.gz'. When completed, the installation directory should looks something like this:
% ls $RM_INSTALL_DIR
Inca-ReporterManager-8.6279    build.log    lib    var
Inca-ReporterManager.tar       buildRM.sh   man
bin                            etc          sbin

% ls $RM_INSTALL_DIR/etc/
common  log4j.properties  rmcert.pem  rmkey.pem  trusted
Next, install the initial set of reporters and their libraries. Download Inca reporters tarball. Then unpack the Inca-Reporters.tar.gz tarball and install into the reporter manager directory as follows:
% cd $RM_INSTALL_DIR/var
% tar zxvf ../Inca-Reporter.tar.gz
% cd Inca-Reporter-*
% perl Makefile.PL PREFIX=${RM_INSTALL_DIR}/var/reporter-packages INSTALLDIRS=perl LIB=${RM_INSTALL_DIR}/var/reporter-packages/lib/perl INSTALLSCRIPT=${RM_INSTALL_DIR}/var/reporter-packages/bin INSTALLMAN1DIR=${RM_INSTALL_DIR}/var/reporter-packages/man/man1 INSTALLMAN3DIR=${RM_INSTALL_DIR}/var/reporter-packages/man/man3
% make
% make install
The suite and any changes to that suite are emailed to the resource administrator specified by the Inca administrator in Step 1. For example,
 % mail
 Mail version 8.1 6/6/93.  Type ? for help.
 "/var/mail/ssmallen": 1 message 1 new
 >N  1 inca@sdsc.edu  Tue Jan 30 15:01 118/3642  "[inca notification] change"
 & t 1
 Message 1:
 From inca@rocks-101.sdsc.edu  Tue Jan 30 15:01:03 2007
 To: inca@sdsc.edu
 Subject: [inca notification] change to suite inca://localhost:6323/sampleSuite  for resource 'manualResource'
 Date: Tue, 30 Jan 2007 15:01:01 -0800 (PST)

 <suite xmlns="http://inca.sdsc.edu/dataModel/suite_2.0">
   <seriesConfigs xmlns="">
       <seriesConfig>
...
Save the message to a file called $RM_INSTALL_DIR/suite.xml and edit out the email headers until just the xml remains. E.g.,
 <suite xmlns="http://inca.sdsc.edu/dataModel/suite_2.0">
   <seriesConfigs xmlns="">
       <seriesConfig>
...
 </suite>
Next, create a repository catalog file called $RM_INSTALL_DIR/var/reporter-packages/repository.xml to tell the reporter manager where the reporters are installed (relative to $RM_INSTALL_DIR/var/reporter-packages). The repository.xml will need to contain every reporter that is listed in suite.xml. Currently, there are 2 types of entries in the catalog: reporters and perl libraries. Each package has 4 tags: dependency, name, path, and version. You can copy the default repository catalog with the following command, but will need to update it with any non-default reporters configured in the suite.xml file:
% cp $RM_INSTALL_DIR/var/Inca-Reporter-*/etc/common/sampleRepository.xml $RM_INSTALL_DIR/var/reporter-packages/repository.xml
Finally, you can start up the reporter manager using the following command-line (replace "depotHost" with the hostname where the depot is running):
% cd $RM_INSTALL_DIR; ./sbin/inca reporter-manager -d incas://depotHost:6324 -c etc/rmcert.pem -k etc/rmkey.pem -t etc/trusted -e bin/inca-null-reporter -r var/reporter-packages -R sbin/reporter-instance-manager -v var -w 1 -i manualResource -s suite.xml -L DEBUG -l var/reporter-manager.log -P true
Enter the password for the reporter manager key. Check to make sure the reporter manager is running by doing a "ps | grep reporter-manager" and make sure there aren't errors by doing a "grep ERROR $RM_INSTALL_DIR/var/*".
To stop the reporter manager at any time, type
% ./sbin/inca stop reporter-manager
Make sure all reporter-manager ps are stopped
% ps | grep manager
Notes about email notification:
The resource administrator will need to edit suite.xml with any changes that are received by email, edit the repository.xml with any new reporters, and then restart the reporter manager.
The <action> tag in the emailed change indicates how to edit suite.xml. For example, <action>add</action> would be an addition to the existing suite.
If a manual reporter manager has multiple suites, the <seriesConfigs xmlns=""> emailed in each suite can be combined and put into a single suite.xml document beginning with <suite xmlns="http://inca.sdsc.edu/dataModel/suite_2.0">.
Each time the agent is restarted the manual reporter manager administrator will receive an email for each suite that the agent would otherwise send directly to the reporter manager. These emails do not necessarily contain changes to the suite(s).
12.4. Source Distributions
Source distributions of the Inca components are also available. The following table lists the Inca component source distributions and shows how to build each of them. Note, that Apache Ant is needed for the Inca components implemented in Java.
Table 5. Inca component source distributions
Component | Build |
|---|---|
ant -Dinstalldir=$INCA_DIST install | |
common (used by all Inca Java components) | ant -Dinstalldir=$INCA_DIST install |
ant -Dinstalldir=$INCA_DIST install | |
ant -Dinstalldir=$INCA_DIST install | |
ant -Dinstalldir=$INCA_DIST install | |
perl Makefile.PL <options> | |
perl Makefile.PL <options> | |
perl Makefile.PL <options> |
13. Component Man Pages
Each of the inca components has options that can be set in either the inca.properties file or on the command line as described in Section 12.1. To see a list components use the bin/inca help command:
% cd $INCA_DIST % bin/inca help Usage: inca <subcommand> [options] [args] Type 'inca help <component>' for help on a specific component Available subcommands: createauth default init help start stop version agent depot incat reporter-manager consumer |
For example, here are the options for the depot, agent, reporter-manager, consumer and incat components:
13.1. Depot
% bin/inca help depot java edu.sdsc.inca.Depot P|password str Specify how to obtain encryption password V|version null Display program version a|auth boolean Authenticated (secure) connection? c|cert path Path to the authentication certificate d|dbinit null init depot DB tables h|help null Print help/usage h|hostname str Hostname the server should provide to clients i|init path Path to properties file k|key path Path to the authentication key l|logfile str Route log messages to a file n|numthreads int # threads in worker pool p|port int Server listening port r|remove null remove depot DB tables t|trusted path Path to authentication trusted certificate dir v|var path Absolute path to server temp dir |
13.2. Agent
% bin/inca help agent java edu.sdsc.inca.Agent C|check str check the reporter manager stage on resources D|depot str Depot specification; host:port P|password str Specify how to obtain encryption password R|refreshPkgs int refresh period for checking for package updates S|server str Server specification; host:port S|startAttempt int period between re-start attempts of the manager V|version null Display program version a|auth boolean Authenticated (secure) connection? b|buildscript str path to reporter manager build script c|cert path Path to the authentication certificate e|email str email to send notifications of manager restarts h|help null Print help/usage h|hostname str Hostname the server should provide to clients i|init path Path to properties file k|key path Path to the authentication key l|logfile str Route log messages to a file n|numthreads int # threads in worker pool p|port int Server listening port r|rmdist str path to reporter manager tarball distribution s|stayAlive int period between stay alive pings of the manager t|trusted path Path to authentication trusted certificate dir u|upgrade str upgrade the reporter manager install on resources v|var path Absolute path to server temp dir |
13.3. Reporter Manager
% sbin/inca help reporter-manager
Usage:
    reporter-manager [-a|-s] [options]

Options:
    a|--agent
         A string containing the URI to the Reporter Agent process that will
         be responsible for the reporter manager. Either this option or -s
         must be specified. Currently accepted URIs include:

         incas://host:port inca://host:port

    -c|--cert
         A path to a valid certificate file [default: none]

    -d|--depot
         A string containing the URI of a depot to send its reporter data
         to. Currently accepted URIs include:

         incas://host:port inca://host:port file://path

         This option can be specified more than once. The report will be
         sent to the first specified depot. If the first depot is
         unreacheable, the next depots in the list will be tried.

    -e|--error-reporter
         A string containing a path to the error reporter. E.g.,
         inca-null-reporter

    -h|--help
         Print help/usage information

    -i|-id
         The resource identifier supplied by the reporter agent that the
         reporter manager will use to identify itself back to the reporter
         agent.

    -k|--key
         A path to a valid key file [default: none]

    -l|--logfile
         A string containing a path to the file where the log messages can
         be stored. If not specified, log messages will be printed to the
         console.

    -L|--level
         A string containing the log message level (i.e., print statements
         of this level and higher). [default: INFO]

    -P|--passphrase
         Read a passphrase for key from stdin

    -r|--reporter-cache
         A string containing the path to the local cache of reporters.

    -R|--rim
         A string containing a path to the reporter-instance-manager script.
         If not specified, this script will look into the directory where
         itself is located.

    -s|--suite
         A string containing a path to the Inca suite file containing the
         reporters to be executed.

    -t|--trusted
         A path to either a directory or file of trusted certificates
         [default: none]

    -v|--var
         A string containing a path to a temporary file space that Inca can
         use while executing reporters

    -w|--wait
         A positive integer indicating the period in seconds of which to
check the reporter for a timeout [default: 2] |
13.4. Consumer
% bin/inca help consumer java edu.sdsc.inca.Consumer P|password str Specify how to obtain encryption password V|version null Display program version a|agent str URI to the Inca agent a|auth boolean Authenticated (secure) connection? c|cert path Path to the authentication certificate d|depot str URI to the Inca depot h|help null Print help/usage i|init path Path to properties file k|key path Path to the authentication key l|logfile str Route log messages to a file m|maxWait int Max wait time a JSP tag should wait on a cached item p|port int Server listening port r|reload int Reload period for cached objects (e.g., suites) t|trusted path Path to authentication trusted certificate dir v|var path Path to temporary directory w|webapp str Path to consumer war file |
13.5. Incat
% bin/inca help incat java incat A|agent str Agent specification; host:port P|password str Specify how to obtain encryption password V|version null Display program version a|auth boolean Authenticated (secure) connection? c|cert path Path to the authentication certificate f|file path Inca installation configuration file path h|help null Print help/usage i|init path Path to properties file k|key path Path to the authentication key l|logfile str Route log messages to a file t|trusted path Path to authentication trusted certificate dir |
13.6. Inca Web Services
% ./bin/inca help incaws incaws [opts] depot agent --auth=yes/no --cert=path --help=yes/no --init=path --key=path --logfile=path --password=str --port=int --trusted=path --version=yes/no |