- Table of Contents
- 1. Introduction
- 2. Get Inca
- 2.1. Prerequisites
- 2.2. Recommendations
- 2.3. Install Binary Distribution
- 3. Display Data
- 4. Configure Inca Components
- 5. Troubleshoot
1. Introduction
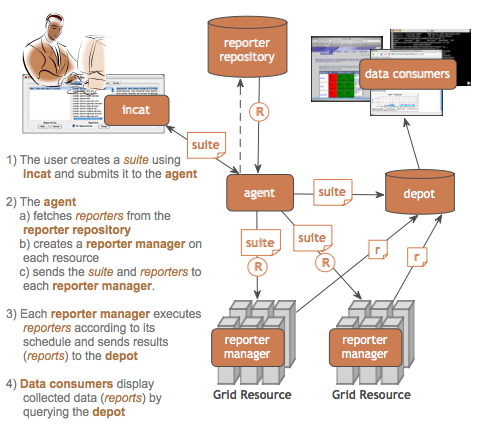
The Inca Test Harness and Reporting Framework (Inca) is a generic framework for the automated testing, benchmarking and monitoring of Grid resources. Inca provides the scheduled execution of information gathering scripts (reporters) and collects, archives, and publishes the data resulting from these scripts.
Inca is composed of five main components:
Reporter - script or executable that performs a test, benchmark, or query and formats its results in Inca compliant XML.
Reporter Repository - a trusted authority that hosts a directory of reporters and reporter libraries that can be fetched from a reporter agent and used in an Inca deployment to collect data from resources.
Reporter Manager - a thin client of the Inca control framework which executes on the monitored resources. It handles scheduled and local-execution of reporters and stores the resulting data into a depot. A reporter manager trusts one and only one reporter agent who it registers with and accepts control changes from.
Reporter Agent - configures data collection at various intervals by delegating the execution of a corresponding reporter suite to a set of reporter managers. Configures data storage requirements.
Depot - stores reporter data collected by the reporter managers and handles all data queries.
Inca's data is displayed by data consumers (e.g. Web scripts, command line scripts, or Java GUIs) that query the depot for data. The Inca software is administered via a Java GUI called the Inca Administration Tool (incat).
[ top of page ]
2. Get Inca
This section describes how to obtain, install and verify the Inca 2.0 software.
2.2. Recommendations
We recommend that Inca be run under a regular user account and not as root for the following reasons:
To best detect user-level problems, it is best that Inca run as a regular use account with the default environment setup.
Inca does not require any special privileges to run.
Furthermore, we recommend that a valid GSI credential be obtained for this regular user account so that Grid tests requiring proxy certificates can be executed. Please request a GSI credential from your virtual organization's Certificate Authority (CA) and consult your organization's security policy regarding GSI credential use. Note that because Inca is an automated system, it will need continual access to valid proxy credentials on each resource for certain tests.
 | The following sections assume that you are installing Inca under a regular user account called inca. |
[ top of page ]
2.3. Install Binary Distribution
Currently, we are providing binary distributions of Inca (source distributions will be added later). To install the a binary distribution, first download the incaInstall.sh script:
% wget http://inca.sdsc.edu/downloads/incaInstall.sh
Execute the install script. The install script requires the location of the directory where you want to install Inca (in the example below this is $INCA_INSTALL - either set the environment variable or replace $INCA_INSTALL with your own install directory path) and the Inca components you wish to install (options are "all", "server" and "incat"):
% chmod 755 incaInstall.sh; ./incaInstall.sh $INCA_INSTALL all
The script will download the binary distributions from our website and unpack them in the installation directory you specified. You should see something like:
Retrieving http://inca.sdsc.edu/releases/current/inca-common-java-bin.tar.gz
--12:49:38--  http://inca.sdsc.edu/releases/current/inca-common-java-bin.tar.gz
=> `inca-common-java-bin.tar.gz'
Resolving inca.sdsc.edu... 198.202.75.28
Connecting to inca.sdsc.edu|198.202.75.28|:80... connected.
HTTP request sent, awaiting response... 200 OK
Length: 5,921,461 [application/x-tar]

100%[======================>] 5,921,461      1.23M/s    ETA 00:00

12:49:43 (1.18 MB/s) - `inca-common-java-bin.tar.gz' saved [5921461/5921461] ...
common-java installed ...
agent installed ...
consumers installed ...
depot installed ...
incat installed
Change to the top level directory of your Inca installation:
% cd $INCA_INSTALL
Create certificates for the Inca components (enables secure component communication):
% ./bin/inca createauth
You should now see a certificate/key created for each of the four Inca components and stored in $INCA_INSTALL/etc:
Generating a 512 bit RSA private key
.++++++++++++
writing new private key to 'clientx.sdsc.edukey.pem'
-----
agent
Generating a 512 bit RSA private key
.++++++++++++
writing new private key to 'agentkey.pem' ...
writing new private key to 'consumerkey.pem' ...
writing new private key to 'depotkey.pem' ...
writing new private key to 'incatkey.pem' ...
Start the Inca components: agent, depot, and consumer. By default, they will be started on ports 6323, 6324, and 8080 respectively. Please edit the inca.properties file in etc/common to change these defaults.
The following command will start all four Inca components, but you can also start or stop components with "./bin/inca [start|stop] [all|agent|depot|consumer|incat]". The command below is a special case for initializing components.
% ./bin/inca default
You should see something like:
** Warning:  this will erase any previously collected reporter state
   on the Inca depot and configuration on the agent
Do you wish to continue (y/n)? y
Initializing depot...
Initializing c3p0 pool... com.mchange.v2.c3p0.PoolBackedDataSource@904b13 [ connectionPoolDataSource -> com.mchange.v2.c3p0.WrapperConnectionPoolDataSource@58bc22 [ acquireIncrement -> 1, acquireRetryAttempts -> 30, acquireRetryDelay -> 1000, autoCommitOnClose -> false, automaticTestTable -> null, breakAfterAcquireFailure -> false, checkoutTimeout -> 0, connectionTesterClassName -> com.mchange.v2.c3p0.impl.DefaultConnectionTester, factoryClassLocation -> null, forceIgnoreUnresolvedTransactions -> false, idleConnectionTestPeriod -> 0, initialPoolSize -> 3, maxIdleTime -> 1800, maxPoolSize -> 10, maxStatements -> 50, maxStatementsPerConnection -> 0, minPoolSize -> 3, nestedDataSource -> com.mchange.v2.c3p0.DriverManagerDataSource@e8b5fe [ description -> null, driverClass -> null, factoryClassLocation -> null, jdbcUrl -> jdbc:hsqldb:test, properties -> {user=******, password=******} ] , preferredTestQuery -> null, propertyCycle -> 300, testConnectionOnCheckin -> false, testConnectionOnCheckout -> false, usesTraditionalReflectiveProxies -> false ] , factoryClassLocation -> null, numHelperThreads -> 3, poolOwnerIdentityToken -> 904b13 ]
Database Initialization Completed
done
Initializing agent
done
Started Inca agent
Started Inca consumer
Started Inca depot
Sleeping for 20 seconds while the components come online
Deploying default configuration
Suite GUIDs are:
  client.host.name:6323/TestSuiteLocal
During this step:
the Depot is initialized
Reporter Agent, Depot, and Consumer servers are started
there is a 20 second wait to wait for servers to start up
a "TestSuiteLocal" suite is sent to the Reporter Agent requesting reporters to be started on localhost using the schedule:
1-59/10 * * * * cluster.math.atlas.version
2-59/10 * * * * cluster.compiler.gcc.version
3-59/10 * * * * cluster.security.openssl.version
4-59/10 * * * * cluster.interactive_access.openssh.version
5-59/10 * * * * cluster.interactive_access.openssh.unit
6-59/10 * * * * viz.lib.vtknvgl.version
7-59/10 * * * * viz.lib.chromium.version
8-59/10 * * * * cluster.compiler.any.unit
the Reporter Agent receives "TestSuiteLocal" suite and installs a reporter manager on the localhost in ~/inca2install (takes 1-5 minutes - view progress of build in ~/inca2install/build.log)
after Reporter Manager is built, it registers itself with Reporter Agent. Reporter Agent sends reporters, libraries, and schedule to Reporter Manager.
Reporter Manager executes reporters based on schedule. Should see at least one box filled in the step below within 3 minutes.
Inca components are started on the following default ports:
Depot           6324
Reporter Agent  6323
Data Consumer   8080
A sample set of reporters runs when the depot and agent start up for the first time. To see the results and verify that your Inca installation is working correctly, point your browser to (replace "your.host.name" with the name of the machine running the Inca consumers component - starting a Web server is not required):
http://your.host.name:8080/xslt.jsp?xsl=http://your.host.name:8080/swStack.xsl&resourceID=defaultvo&suiteName=TestSuiteLocal
If you do not see a grid of results, check the .log files in $INCA_INSTALL/var. There is more information about data display in Section 3.
View the Inca Administration Tool (incat):
Use the following command to start incat:
% cd $INCA_INSTALL; ./bin/inca start incat -A localhost:6323 &
OPTIONAL: If you don't see Java GUI windows pop up like those in Figure 2 and Figure 3 after starting all components in the step above, it is probable that X-Window forwarding is not set up correctly between the machine where you installed Inca and your local machine. You can either configure X-Window forwarding, or you can start incat on a local machine:
Copy the incaInstall.sh script to a local machine.
% wget http://inca.sdsc.edu/downloads/incaInstall.sh
Install the incat component on a local machine:
% ./incaInstall.sh $INCA_INSTALL incat
Copy the incat key, certificate, and trusted directory from the original machine to your local machine:
% scp orig.machine:$ORIG_INCA_INSTALL/etc/incatkey.pem $INCA_INSTALL/etc/; \
  scp orig.machine:$ORIG_INCA_INSTALL/etc/incatcert.pem $INCA_INSTALL/etc/;
  scp "orig.machine:$ORIG_INCA_INSTALL/etc/trusted/*" $INCA_INSTALL/etc/trusted/;
Change the agent key/cert to incat key/cert in the $INCA_INSTALL/etc/common/inca.properties local file:
#---------------------------------------------------------------------------
# agent
#---------------------------------------------------------------------------

inca.agent.auth=true
inca.agent.password=
inca.agent.cert=incatcert.pem
inca.agent.key=incatkey.pem
inca.agent.trusted=trusted
Start the incat component on a local machine with the agent hostname from the original machine:
% cd $INCA_INSTALL; ./bin/inca start incat -A ORIGHOST:6323 &
You should now see the Java GUI window appear on your local machine.
Once incat has information from the agent, the following screen will display:


[ top of page ]
3. Display Data
An installation of Inca is working if reporter results can be displayed by data consumers (e.g. Web scripts, command line scripts, or Java GUIs) that query the depot for data. A data consumer for displaying software stack reporter suite data is provided in the 2.0 release of Inca. The following steps describe the configuration of the sample data consumer, a jsp script called xslt.jsp.
Inca uses Jetty, a Java HTTP server and servlet container, to run its jsp data consumer. Jetty starts on port 8080 by default, but can be configured to start on another port. A separate Web server (like Apache) is not required. More information about Jetty is available at the Jetty homepage.
3.1. Software Stack Data Consumer
The results from the sample suite that executed when the depot and agent were started should now be visible from the xslt.jsp page. The jsp requires two input parameters to display either suite results or a series results.
To display suite results the jsp requires a:
suiteName: the name of the suite from incat (e.g. "TestSuiteLocal") and a
resourceID: the resource group name from incat (e.g. "defaultvo")
The jsp then combines:
an XML array of reportSummary results (one for each of the series in the suite) from the depot
XML resource configuration information from incat
software package information from an XML file called $INCA_INSTALL/etc/common/swStack.xml (can be edited to change appearance of page)
and then either displays the XML or displays formatted XML (see Figure 4). Formatted XML, an HTML grid, is displayed if xslt.jsp is also given the path to an xsl file (an example xsl file called $INCA_INSTALL/etc/swStack.xsl is provided). The sample xsl file uses a cascading style sheet ($INCA_INSTALL/etc/inca.css) which can be changed along with the xsl to customize the appearance of the pages.
The URL to display the sample suite results from the xslt.jsp page is (replace "your.host.name" with the name of the machine running the Inca consumers component):
http://your.host.name:8080/xslt.jsp?xsl=http://your.host.name:8080/swStack.xsl&resourceID=defaultvo&suiteName=TestSuiteLocal |
The URL to display the sample suite results with a local xsl file is (replace "your.host.name" as above and replace "/path/to/xsl/" with the directory your xsl file is in):
http://your.host.name:8080/xslt.jsp?xsl=/path/to/xsl/swStack.xsl&resourceID=defaultvo&suiteName=TestSuiteLocal |

To display a series results the jsp requires a:
configID: the reportSummary/reportSeriesConfigId of a series from the XML created by "xslt.jsp?suiteName=X&resourceID=Y" and an
instanceID: the reportSummary/instanceId of a series from the XML created by "xslt.jsp?suiteName=X&resourceID=Y"
The jsp then gets the series XML result and then either displays the XML or displays formatted XML (see Figure 5). The formatted XML, an HTML table, is again displayed if the jsp is given the path to an xsl file.
Individual series results are linked from the suite results page with URLs like the following (this is an example, your URLs will have different instanceID and configID values):
http://your.host.name:8080/xslt.jsp?xsl=http://your.host.name:8080/swStack.xsl&instanceID=24&configID=1 |

Note that the reporters.cgi script linked from the details page (by clicking on reporter name) will only be executed if libraries and permissions are set up correctly in the reporter repository location. If the default repository (http://inca.sdsc.edu/2.0/repository) is used, the script will be configured by default. If you create your own repository, it must be web accessible and you must make an .htaccess file with the location of reporter libraries and permission to execute CGI script like the following (replace $INCA_INSTALL/Inca-Reporter-* with the path to your reporter lib directory):
SetEnv PERL5LIB /$INCA_INSTALL/Inca-Reporter-*/lib Options +ExecCGI |
Your webmaster may have to edit httpd.conf or otherwise configure permissions if you are unable to set them in .htaccess.
[ top of page ]
4. Configure Inca Components
4.1. The Inca Administration Tool
The Inca Administration Tool, or incat, is designed to make the installation, setup, data collection, and maintenance of the Inca deployment straightforward and configurable. An administrator can use incat to configure:
reporter repositories
resource information
reporter execution
incat is the client interface to a reporter agent. All information required to configure an Inca installation is stored on the reporter agent and is retrieved by incat as needed.
The Inca administrator first uses incat to specify which reporter repositories serve as the source of an installation's reporters. incat forwards this reporter repository list to the reporter agent, where the agent retrieves and merges catalog information from each reporter repository and returns it to incat as a complete list of available reporters. The administrator then selects a set of reporters to run on an installation's resources, specifying execution attributes for each reporter on each resource. incat returns this information to the reporter agent, which uses it to download reporters from the reporter repositories and construct schedules for transmission to the reporter managers.
| Remember to commit your changes before quitting incat so that they are stored on the agent. |
4.1.1. Configure Reporter Repositories
A reporter repository is a trusted authority that hosts a directory of reporters and reporter libraries that can be fetched from a reporter agent and used in an Inca deployment to collect data from resources.
Although incat is preconfigured to use a standard reporter repository (http://inca.sdsc.edu/2.0/repository), Inca also offers a convenience tool (called incpack) for producing or updating a catalog for an Inca reporter repository. incpack creates local reporter repositories which may be specified to the reporter agent as sources for reporter packages. The incpack script is located in $INCA_INSTALL/Inca-Reporter-*/sbin.
To add non-reporters (e.g., perl libraries) to a repository, they need a companion file with the same name and a .attrib suffix. For example, this is the contents of one such file (Reporter.pm.attrib):
name: Inca::Reporter version: 1.0 description: Inca reporter API base class url: http://inca.sdsc.edu dependencies: |
The following example creates the http://inca.sdsc.edu/2.0/repository default repository locally:
% cd $INCA_INSTALL/Inca-Reporter-*; sbin/incpack -I lib bin/[a-z]* lib/Inca/*.pm lib/Inca/*/*.pm lib/Inca/*/*/*.pm |
There should now be a file called "Packages.gz" in the $INCA_INSTALL/Inca-Reporter-X directory with information about the reporters and libraries in the new repository.
Once a repository has been created, incpack needs to be rerun if any of its reporters or libraries are changed, added or deleted. incpack takes a "-a" switch to indicate that it should append to an existing Packages.gz; otherwise, it overwrites Packages.gz.
Via incat, the Inca administrator tells the reporter agent which repositories to retrieve reporters from by entering the location of the "Packages.gz" file. If the repository is located in a Web accessible directory, its location can be entered as "http://webserver/path/to/repository" (see Figure 6). If the repository is local, it can be entered as "file:///path/to/inca/install/Inca-Reporter-X/dir" (note the three slashes after file:/// - replace "Inca-Reporter-X" with the name of the Inca-Reporter dir under your installation, e.g. Inca-Reporter-1.2179).

[ top of page ]
4.1.2. Configure Resources
Grid nodes are grouped into virtual resource groups and the groups are assigned macros (variables that have one or more values). Groups/macros are then used to configure how reporters will run on the nodes.
Figure 7 illustrates the resource configuration screen in incat. The first window shows the resource group name(s), the second window shows the members that belong to the resource group selected in the first window, and the third window shows the macros that are assigned to the resource group selected in the first window.

When adding a new resource group, members can be either hostnames or other resource group names and are entered as a regular expression. For example, in Figure 8 a new group called "teragrid" is being added that contains groups called "ncsa-ia64", "sdsc-ia64", and "anl-viz". The regular expression for those three groups is "(ncsa|sdsc)-ia64|anl-viz".
In Figure 8, the access method (gram and gridftp servers) is defined with macros. The gram server for the "teragrid" group is @GRAM_SERVER@, which means that it will look for the GRAM_SERVER macro value to be defined in each of its subgroups (sdsc-ia64, etc.) and will use the subgroup value for the subgroup nodes. The the Inca reporter manager will then be started to execute reporters on the gram server. Reporters will be transferred to the reporter manager via the gridftp server.

The Inca reporter manager runs on one login node of a cluster. In the case where login nodes round robin, a resource group should be created for the cluster and the "Round Robin" box should be checked (see Figure 9).

A node gets its macros from the group closest to it. If a node, like tg-login.ncsa.teragrid.org, is listed in the ncsa-ia64 group, and the ncsa-ia64 group is listed in the teragrid group, then the ncsa-ia64 group is closer to the tg-login.ncsa.teragrid.org node than the teragrid group.
When adding macros with more than one value to a resource group (see Figure 8), separate the values with spaces (e.g. value1 value2). Macro values that have spaces in them should always be quoted (e.g. "value 1"). Macros can include other macros by surrounding them with the @ symbol (see the gram server macro in Figure 8).

[ top of page ]
4.1.3. Configure Reporter Execution
A reporter along with its arguments (input parameters), the resource group it runs on, and constraints (setup to be performed before executing the reporter, cleanup to be performed after executing the reporter, frequency of execution, maximum resource usage, and expected output) make up a reporter series. Reporter series are grouped into sets called reporter suites.
Figure 11 shows incat's suite configuration screen. To configure reporter execution, first create a new suite and then add reporter series to the suite.

A new reporter series is being added in Figure 12. Note that the description field becomes the series name in the suite.

[ top of page ]
5. Troubleshoot
Please email <inca@sdsc.edu> with any questions or problems using Inca software.
[ top of page ]